- 1
- 2
- 3
- 4
- 5
- 6
- 7
- 8
- 9
- 10
- 11
- 12
- 13
- 14
- 15
- 16
- 17
- 18
- 19
- 20
- 21
- 22
- 23
- 24
- 25
- 26
- 27
- 28
- 29
- 30
- 31
- 32
- 33
- 34
- 35
- 36
- 37
- 38
- 39
- 40
- 41
- 42
- 43
- 44
- 45
- 46
- 47
- 48
- 49
- 50
- 51
- 52
- 53
- 54
- 55
- 56
- 57
- 58
- 59
- 60
- 61
- 62
- 63
- 64
- 65
- 66
- 67
- 68
- 69
- 70
- 71
- 72
- 73
- 74
- 75
- 76
- 77
- 78
- 79
- 80
- 81
- 82
- 83
- 84
- 85
- 86
- 87
- 88
- 89
- 90
- 91
- 92
- 93
- 94
- 95
- 96
- 97
- 98
- 99
- 100
- 101
- 102
- 103
- 104
- 105
- 106
- 107
- 108
- 109
- 110
- 111
- 112
- 113
- 114
- 115
- 116
- 117
- 118
- 119
- 120
- 121
- 122
- 123
- 124
- 125
- 126
- 127
- 128
- 129
- 130
- 131
- 132
- 133
- 134
- 135
- 136
- 137
- 138
- 139
- 140
- 141
- 142
- 143
- 144
- 145
- 146
- 147
- 148
- 149
- 150
- 151
- 152
- 153
- 154
- 155
- 156
- 157
- 158
- 159
- 160
- 161
- 162
- 163
- 164
- 165
- 166
- 167
- 168
- 169
- 170
- 171
- 172
- 173
- 174
- 175
- 176
- 177
- 178
- 179
- 180
- 181
- 182
- 183
- 184
- 185
- 186
- 187
- 188
- 189
- 190
- 191
- 192
- 193
- 194
- 195
- 196
- 197
- 198
- 199
- 200
- 201
- 202
- 203
- 204
- 205
- 206
- 207
- 208
- 209
- 210
- 211
- 212
- 213
- 214
- 215
- 216
- 217
- 218
- 219
- 220
- 221
- 222
- 223
- 224
- 225
- 226
- 227
- 228
- 229
- 230
- 231
- 232
- 233
- 234
- 235
- 236
- 237
- 238
- 239
- 240
- 241
- 242
- 243
- 244
- 245
- 246
- 247
- 248
- 249
- 250
- 251
- 252
- 253
- 254
- 255
- 256
- 257
- 258
- 259
- 260
- 261
- 262
- 263
- 264
- 265
- 266
- 267
- 268
- 269
- 270
- 271
- 272
- 273
- 274
- 275
- 276
- 277
- 278
- 279
- 280
- 281
- 282
- 283
- 284
- 285
- 286
- 287
- 288
- 289
- 290
- 291
- 292
- 293
- 294
- 295
- 296
- 297
- 298
- 299
- 300
- 301
- 302
- 303
- 304
- 305
- 306
- 307
- 308
- 309
- 310
- 311
- 312
- 313
- 314
- 315
- 316
- 317
- 318
- 319
- 320
- 321
- 322
- 323
- 324
- 325
- 326
- 327
- 328
- 329
- 330
- 331
- 332
- 333
- 334
- 335
- 336
- 337
- 338
- 339
- 340
- 341
- 342
- 343
- 344
- 345
- 346
- 347
- 348
- 349
- 350
- 351
- 352
- 353
- 354
- 355
- 356
- 357
- 358
- 359
- 360
- 361
- 362
- 363
- 364
- 365
- 366
- 367
- 368
- 369
- 370
- 371
- 372
- 373
- 374
- 375
- 376
- 377
- 378
- 379
- 380
- 381
- 382
- 383
- 384
- 385
- 386
- 387
- 388
- 389
- 390
- 391
- 392
- 393
- 394
- 395
- 396
- 397
- 398
- 399
- 400
- 401
- 402
- 403
- 404
- 405
- 406
- 407
- 408
- 409
- 410
- 411
- 412
- 413
- 414
- 415
- 416
- 417
- 418
- 419
- 420
- 421
- 422
- 423
- 424
- 425
- 426
- 427
- 428
- 429
- 430
- 431
- 432
- 433
- 434
- 435
- 436
- 437
- 438
- 439
- 440
- 441
- 442
- 443
- 444
- 445
- 446
- 447
- 448
- 449
- 450
- 451
- 452
- 453
- 454
- 455
- 456
- 457
- 458
- 459
- 460
- 461
- 462
- 463
- 464
- 465
- 466
- 467
- 468
- 469
- 470
- 471
- 472
- 473
- 474
- 475
- 476
- 477
- 478
- 479
- 480
- 481
- 482
- 483
- 484
- 485
- 486
- 487
- 488
- 489
- 490
- 491
- 492
- 493
- 494
- 495
- 496
- 497
- 498
- 499
- 500
- 501
- 502
- 503
- 504
- 505
- 506
- 507
- 508
- 509
- 510
- 511
- 512
- 513
- 514
- 515
- 516
- 517
- 518
- 519
- 520
- 521
- 522
- 523
- 524
- 525
- 526
- 527
- 528
- 529
- 530
- 531
- 532
- 533
- 534
- 535
- 536
- 537
- 538
- 539
- 540
- 541
- 542
- 543
- 544
- 545
- 546
- 547
- 548
- 549
- 550
- 551
- 552
- 553
- 554
- 555
- 556
- 557
- 558
- 559
- 560
- 561
- 562
- 563
- 564
- 565
- 566
- 567
- 568
- 569
- 570
- 571
- 572
- 573
- 574
- 575
- 576
- 577
- 578
- 579
- 580
- 581
- 582
- 583
- 584
- 585
- 586
- 587
- 588
- 589
- 590
- 591
Configuring Module Order Manager for OpenCart
-
Installing “NeoSeo Order Manager”
To install the module “NeoSeo Order Manager” for OpenCart you need :
- Go to the site administration panel and select the section “Add-ons”->”Modules”:

- In the list of modules that opens, select “NeoSeo Order Manager” and click the “Install”:

- Go to the “Add-ons”->”Add-ons Manager” section and click on the “Update” button in the window that opens.

This completes the installation of the module and you can proceed to editing the module settings.
-
Edit module settings
To edit the module settings, go to the site's admin panel and select the “Add-ons”->”Modules” section. In the list of modules that opens, select “NeoSeo Order Manager” and click on the “Edit” button:
After that, a window for editing module settings will appear on the screen:
Tab “General” is intended for setting the following parameters:
- Status. In OpenCart, standard order management is available under “Sales”->”Orders”:

This module for OpenCart allows you to add a new menu item “Order manager” to the site administration panel, which allows you to increase the speed of order processing by the online store manager.< br /> In order to add this menu item to the administrative panel, in the “Status” field, select the “Enabled”:
As a result, advanced order management is available in “Sales”->”Order Manager”:
- Remove the standard one. If “Enabled” is selected in this field, then in the site administration panel, instead of the standard order manager, an improved order manager will be displayed:

If the “Disabled” value is selected in this field, then both the standard order manager and the advanced one will be available in the site administration panel:
- Hide inaccessible. If “Enabled”, is selected in this field, then the new menu item will be available for viewing only to those users who have rights to view orders:

- If “Disabled” is selected in this field, then the new menu item will be available for viewing by all users:

- Message block to display. If “Enabled”, is selected in this field, then in “Order Manager”, in the < strong>“Action”, the ability to send SMS and E-mail messages to the client will be added:


If “Disabled” is selected in this field, then in “Order Manager”, column “Action” will look like this:

- Displayed statuses. Using this field, you can specify the orders with which statuses to display in the order manager.
For example, if you want to view orders that have not yet been completed, then in this field select all statuses, except for the status “Order completed”:
Important!!! After adding all the changes, you must click the “Save” button:

The “Columns” tab is designed to form the required number of columns in the orders table, as well as to specify the information that will be displayed in the columns:
This tab allows you to create new columns, as well as edit and delete existing ones.
To add a new column to the orders table, click on the “Create” button:
As a result, a form for creating a new column will open:
The following fields must be filled in on the form:
- Title. In this field, you must specify a name for the new column. For example, let's create a column called “Order”:

- Width. Specify the width of the column in this field. For example, enter 150:

- Template. This field is used to specify the information to be displayed in this column. For example, let's create the following template:

In this example, the template contains tags that can be used to display information in columns. For example, the {order_id} tag contains the order number, {date_added} the order creation date, and the {status} tag the order status. Using these tags, you can display the necessary information in the columns in a form convenient for you. Tag descriptions can be viewed on the “Fields” tab:
Important!!! After adding all the changes, you must click the “Save” button:

As a result, the created column is available in the column list:
In order to delete a column from the table of orders, specify the required column and click the “Delete” button:
To edit an existing column, select the required column and click the “Edit” button:
As a result, the column editing form will open:
After making the necessary changes, click the “Save” button.
The “Buttons” tab is designed to create additional buttons that will be displayed in the order manager:
To create a new button, click on the “New” button:

As a result, a form for creating a new button will open:
The following fields must be filled in on the form:
- Name. In this field, you must specify the name of the new button. For example, let's create a button that will display an invoice for an order and call it “Show invoice”:

- Class. If you need to add your own CSS class for the button, enter the class name in this field.

- Style. If you want to add a different style to the button, enter the name of the style in this field.
- Link. This field is intended to indicate a link to the page to which the user will be redirected after clicking the button.
Since the button is designed to view the order invoice, add the following link: sale/order/invoice:
Important!!! After adding all the changes, you must click“Save”:
As a result, the created button is available in the list of buttons:
After saving, this button is available in the order manager:
For an example, let's select an order from the list of orders and click on the button “Show invoice”:
As a result, the invoice form for the selected order will open:
To remove a button from the order manager, select the required button from the list and click “Delete”:
To edit an existing button, select the desired button and click “Edit”:
The button editing form will appear on the screen:
After making the necessary changes, click on the “Save” button.
The “Products” tab is designed to specify the format for displaying the list of products in the orders table:
This tab contains a "Product List Format" field. In this field, you must specify what information you want to display about the ordered products and in what form. For example, let's set the following format:
{product.image}{product.name}
{order_product.quantity} x {order_product.price}
where {product.image} is the product image;
{product.name} - product name;
{order_product.quantity} the quantity of the ordered product;
{order_product.price} price of the ordered product
As a result, in the order manager, in the “Products”, column, the output of product information will look like this:
The “History” tab is intended to specify the display format for the order status change history in the orders table:
This tab contains the “Order status change history format” field. In this field, you need to specify what information you want to display about order status changes. For example, let's set the following format:
{order_history.date_added} – {order_status.status}
where {order_history.date_added} is the date the order history was added;
{order_status.status} - order status.

Important!!! In order to view the order history in the order table, you need to add the corresponding column in the “Columns” tab:
As a result, in the order manager, in the “History”, column, the output of the history of order status changes will look like this:
The “Status Restrictions” tab is designed to set restrictions on changing order statuses when viewing and bulk changing order status:
What is this tab for? In the order manager, when viewing an order, you can change its status. Also, when mass changing order statuses, a list of statuses is offered, to which you can change the current order statuses.
Using this tab, for each order status, you can specify the allowed set of statuses when changing.
For example, order status “Sent by Ukrposhta” can only be changed to status “Order completed”:
And the order status “New” can be changed, for example, to “Processing”, “Awaiting pickup”, “Sent by courier”, “Sent by new mail”, “Sent by Ukrposhta”:
After adding allowed status sets on change, for all statuses available in the system, click on the button “Save permission set”:
The “Colors” tab is designed to select the color of an entry in the orders table for each order status:
To change the colors of entries in the order table, select the required status and click on the entry color:

Important!!! After adding all the changes, you must click“Save”:
After saving all the necessary settings, you can view the list of orders in the "Sales"-> "Order Manager":
Order manager allows you to:
- Change the status of several orders at once directly from the list of orders.
In order to change the status of an order from the list of orders, select the desired order (or several orders), in the “Batch status change” field, select the status to change and click on the “Edit” button:
After clicking the “Edit” button, a dialog box will appear, with which you can add a comment to the order and send it to the customer:
As a result, the status of order #86 will change to “Sent by courier”:
- Search for required orders by various parameters.
This module allows you to search for orders by the following options: “Order (order number)”, “Customer”, “Delivery”, “Payment”, “Products”, “History” , “Date from”, “Date to”:
To filter orders, enter a value in the required option and click on the “Filter” button. For example, let's filter by the “Customer” option:
After clicking on the button “Filter”, we get the result of filtering:
- View orders. To do this, select the desired order and click on the “View”:

As a result, we go to the order description form:

- Edit required orders. To do this, select the desired order and click on the “Edit” button:

As a result, we go to the order editing form:

On this form, you can edit all the necessary information about the order. After adding the changes, click on the “Save” button.
- Delete orders. To do this, select the required order and click the “Delete” button:

- Add new orders. To add a new order, click on the “Add” button:

As a result, we go to the form for creating a new order:
 On this form, fill in all the necessary information about the new order. Please note that the form contains required fields marked with *.
After adding changes, click on the “Save” button.
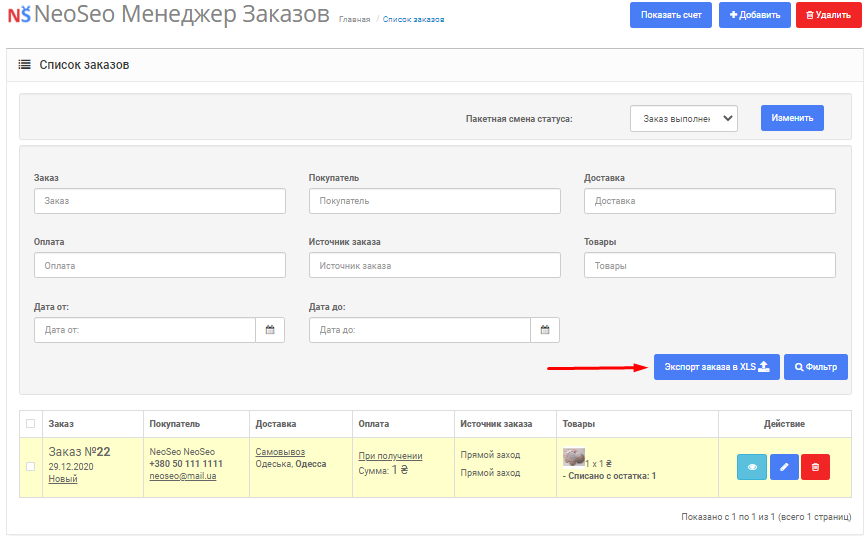
- Export orders to XLS. This module allows you to export information about all orders to an excel document. To do this click on the button “Export Order to XLS”:
Didn't find the answer to your question? — Set it on our forum:


Comments