- 1
- 2
- 3
- 4
- 5
- 6
- 7
- 8
- 9
- 10
- 11
- 12
- 13
- 14
- 15
- 16
- 17
- 18
- 19
- 20
- 21
- 22
- 23
- 24
- 25
- 26
- 27
- 28
- 29
- 30
- 31
- 32
- 33
- 34
- 35
- 36
- 37
- 38
- 39
- 40
- 41
- 42
- 43
- 44
- 45
- 46
- 47
- 48
- 49
- 50
- 51
- 52
- 53
- 54
- 55
- 56
- 57
- 58
- 59
- 60
- 61
- 62
- 63
- 64
- 65
- 66
- 67
- 68
- 69
- 70
- 71
- 72
- 73
- 74
- 75
- 76
- 77
- 78
- 79
- 80
- 81
- 82
- 83
- 84
- 85
- 86
- 87
- 88
- 89
- 90
- 91
- 92
- 93
- 94
- 95
- 96
- 97
- 98
- 99
- 100
- 101
- 102
- 103
- 104
- 105
- 106
- 107
- 108
- 109
- 110
- 111
- 112
- 113
- 114
- 115
- 116
- 117
- 118
- 119
- 120
- 121
- 122
- 123
- 124
- 125
- 126
- 127
- 128
- 129
- 130
- 131
- 132
- 133
- 134
- 135
- 136
- 137
- 138
- 139
- 140
- 141
- 142
- 143
- 144
- 145
- 146
- 147
- 148
- 149
- 150
- 151
- 152
- 153
- 154
- 155
- 156
- 157
- 158
- 159
- 160
- 161
- 162
- 163
- 164
- 165
- 166
- 167
- 168
- 169
- 170
- 171
- 172
- 173
- 174
- 175
- 176
- 177
- 178
- 179
- 180
- 181
- 182
- 183
- 184
- 185
- 186
- 187
- 188
- 189
- 190
- 191
- 192
- 193
- 194
- 195
- 196
- 197
- 198
- 199
- 200
- 201
- 202
- 203
- 204
- 205
- 206
- 207
- 208
- 209
- 210
- 211
- 212
- 213
- 214
- 215
- 216
- 217
- 218
- 219
- 220
- 221
- 222
- 223
- 224
- 225
- 226
- 227
- 228
- 229
- 230
- 231
- 232
- 233
- 234
- 235
- 236
- 237
- 238
- 239
- 240
- 241
- 242
- 243
- 244
- 245
- 246
- 247
- 248
- 249
- 250
- 251
- 252
- 253
- 254
- 255
- 256
- 257
- 258
- 259
- 260
- 261
- 262
- 263
- 264
- 265
- 266
- 267
- 268
- 269
- 270
- 271
- 272
- 273
- 274
- 275
- 276
- 277
- 278
- 279
- 280
- 281
- 282
- 283
- 284
- 285
- 286
- 287
- 288
- 289
- 290
- 291
- 292
- 293
- 294
- 295
- 296
- 297
- 298
- 299
- 300
- 301
- 302
- 303
- 304
- 305
- 306
- 307
- 308
- 309
- 310
- 311
- 312
- 313
- 314
- 315
- 316
- 317
- 318
- 319
- 320
- 321
- 322
- 323
- 324
- 325
- 326
- 327
- 328
- 329
- 330
- 331
- 332
- 333
- 334
- 335
- 336
- 337
- 338
- 339
- 340
- 341
- 342
- 343
- 344
- 345
- 346
- 347
- 348
- 349
- 350
- 351
- 352
- 353
- 354
- 355
- 356
- 357
- 358
- 359
- 360
- 361
- 362
- 363
- 364
- 365
- 366
- 367
- 368
- 369
- 370
- 371
- 372
- 373
- 374
- 375
- 376
- 377
- 378
- 379
- 380
- 381
- 382
- 383
- 384
- 385
- 386
- 387
- 388
- 389
- 390
- 391
- 392
- 393
- 394
- 395
- 396
- 397
- 398
- 399
- 400
- 401
- 402
- 403
- 404
- 405
- 406
- 407
- 408
- 409
- 410
- 411
- 412
- 413
- 414
- 415
- 416
- 417
- 418
- 419
- 420
- 421
- 422
- 423
- 424
- 425
- 426
- 427
- 428
- 429
- 430
- 431
- 432
- 433
- 434
- 435
- 436
- 437
- 438
- 439
- 440
- 441
- 442
- 443
- 444
- 445
- 446
- 447
- 448
- 449
- 450
- 451
- 452
- 453
- 454
- 455
- 456
- 457
- 458
- 459
- 460
- 461
- 462
- 463
- 464
- 465
- 466
- 467
- 468
- 469
- 470
- 471
- 472
- 473
- 474
- 475
- 476
- 477
- 478
- 479
- 480
- 481
- 482
- 483
- 484
- 485
- 486
- 487
- 488
- 489
- 490
- 491
- 492
- 493
- 494
- 495
- 496
- 497
- 498
- 499
- 500
- 501
- 502
- 503
- 504
- 505
- 506
- 507
- 508
- 509
- 510
- 511
- 512
- 513
- 514
- 515
- 516
- 517
- 518
- 519
- 520
- 521
- 522
- 523
- 524
- 525
- 526
- 527
- 528
- 529
- 530
- 531
- 532
- 533
- 534
- 535
- 536
- 537
- 538
- 539
- 540
- 541
- 542
- 543
- 544
- 545
- 546
- 547
- 548
- 549
- 550
- 551
- 552
- 553
- 554
- 555
- 556
- 557
- 558
- 559
- 560
- 561
- 562
- 563
- 564
- 565
- 566
- 567
- 568
- 569
- 570
- 571
- 572
- 573
- 574
- 575
- 576
- 577
- 578
- 579
- 580
- 581
- 582
- 583
- 584
- 585
- 586
- 587
- 588
- 589
- 590
- 591
Configuring the module "NeoSeo Exchange with Bitrix24" for the online store {SEO-shop}, OpenCart 2.x, 3.x, ocStore
The contents of the instructions for setting up "NeoSeo Exchange with Bitrix24"
1. Module installation
To install the “NeoSeo Exchange with Bitrix24” module you need:
Install the module files and licenses on the site.
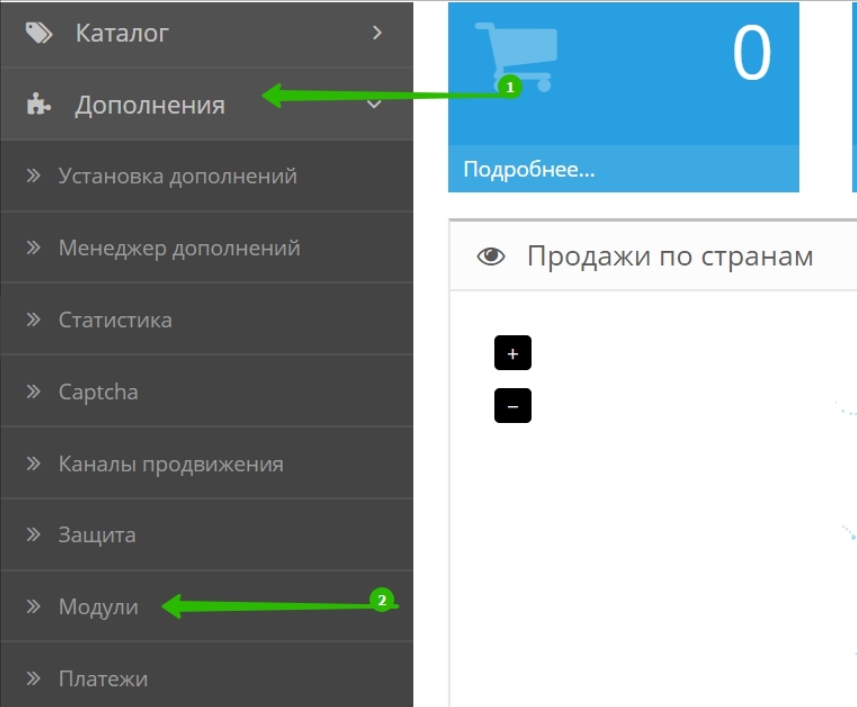
After the module files and license are installed on the site, go to the administrative panel of the site and select the “Add-ons” -> ”Modules” section:
-
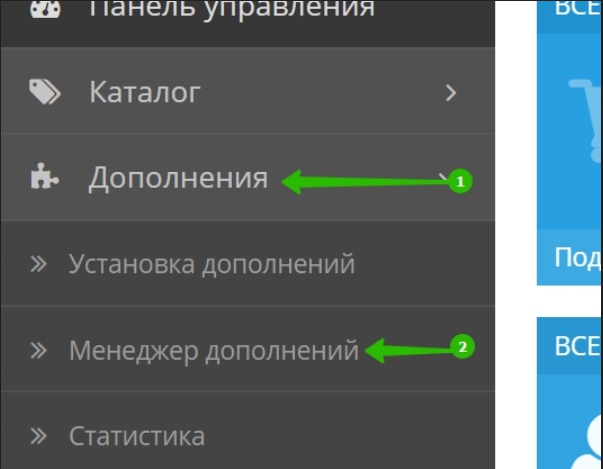
In the list of modules that will open, select “NeoSeo Exchange with Bitrix24” and click the “Install” button:

- It is necessary to go to the section “Add-ons” -> ”Add-ons Manager”:
-
In the “Add-ons Manager” section, you need to update the modifiers.

2. Configure the module and synchronize with Bitrix24
Preparing for synchronization on the Bitrix24 side
In order to set up synchronization with the Bitrix24 system, you need to perform some actions in the system itself.
For synchronization between the opencart site and Bitrix24, the incoming webcaps are used. In order to be able to use the webbooks, the settings must be made under the main user of the system (owner) or under the user with full rights, otherwise the connection to the system will not be available.
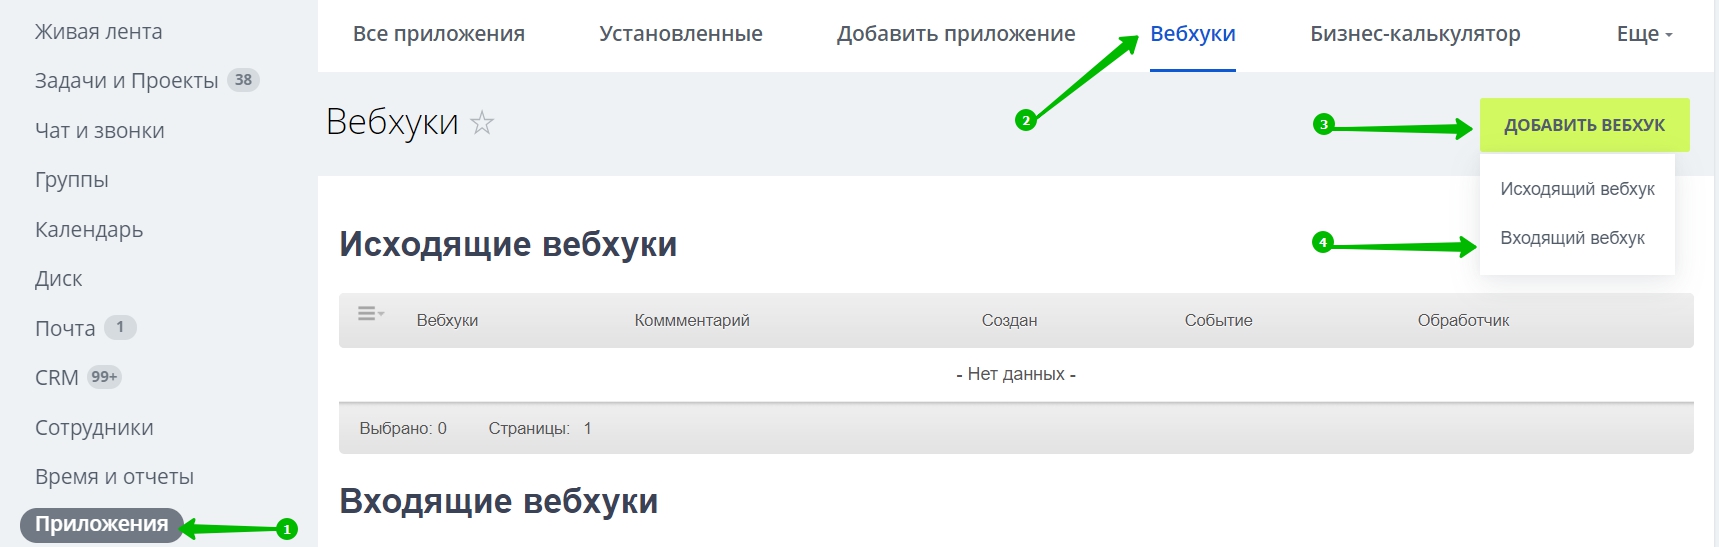
To create an incoming web-based web browser, go to the “Applications” section - “Web-based browsers” and choose to create an incoming web-based web site.
On the addition form of the incoming webhuk, you must fill in the fields “Name”, “Description” (if desired) and select the access rights. Currently the module supports the following rights: Users (user) and CRM (crm). Support for the rest is missing. After entering the settings, you must save the new incoming webhооk.
ATTENTION!!! These rights are Users (user) and CRM (crm) are required to select.
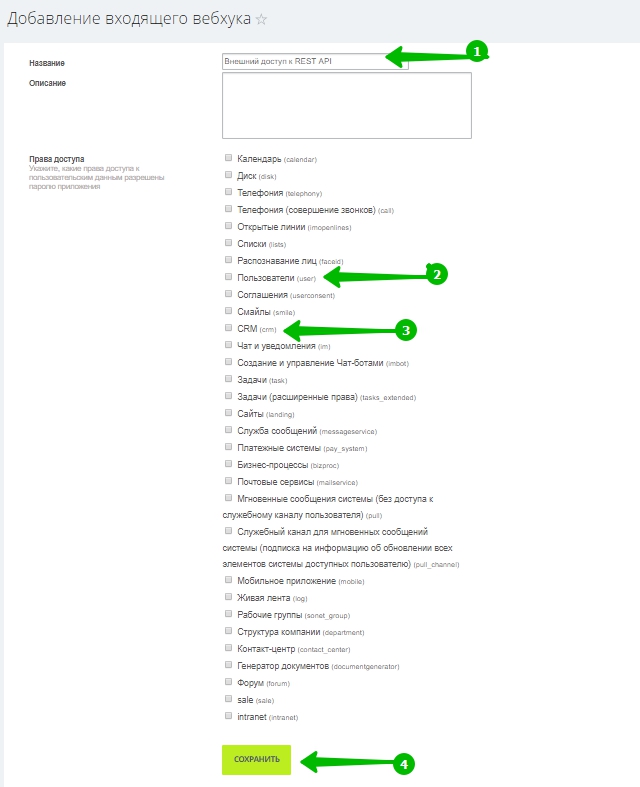
After saving the data will be available:
-
Portal name
-
User ID
-
Secret code
All these data will be required for entering into the module settings.

3. Basic settings of the module
The “Basic Settings” tab contains the basic settings of the module.
Consider each option in more detail.
ATTENTION!!! Without filling out the basic settings, directories that are used in the module settings will not be available. In this case there will be the following message in the module settings:

The list of basic settings of the module:
Status - the status of the module (values Enabled / Disabled).

Portal name - the name of the portal can be obtained through a link in the creation of a webhuk. Specifies only the name of the portal, without bitrix24. For example, the name of the portal test.bitrix24. In the field you must specify test.

User ID — The numeric identifier for the user who created the WebHook. Under the rights of this user this webhuk will work. ID can be obtained through the link in the creation of webhооk.

Secret code - a secret code, you can get through the link in the creation of a webhооk

After entering the settings on the “Basic Settings” tab, you need to save the module settings.
ATTENTION!!! If after entering the basic settings and saving the data from the directories are not available on the tabs, then the connection to the system has not been made and the entered data should be checked.
4. Creating contacts
The “Contacts” tab contains settings that are responsible for creating contacts in Bitrix24. Consider each option in more detail.
Create contact before creating a lead is an option that is responsible for creating a lead with the values Enabled / Disabled. On what basis are the leads described in the next paragraph.

The contact user is an option that assigns the user responsible for contacts in the Bitrix24 system. Available options from the Bitrix24 user directory.
Source when creating a contact is an option that assigns the source of a contact in the Bitrix24 system. Available options from the Bitrix24 source directory.

The default contact type is used if the customer group is not selected in the match table. Available options from the Bitrix24 Contact Type Reference.

Consider the advanced option “Matching table: Buyer group on the site - Contact type in Bitrix24”. This option is necessary if each group of customers on the site is required to associate their contact type in the bitrix24 system.

5. Lead creation
The “Leads” tab contains settings that are responsible for creating leads in Bitrix24.
Consider each option in more detail.
Leads are created only when registering on the site (on a separate registration page, when placing an order), provided that the registration uses standard opencart methods. Implemented lead creation support when a request is received in the “NeoSeo Contact Pickup” and “NeoSeo Subscription for Goods Receipts” module.
Create lead at registration - a lead will be created only using standard registration methods.

The user responsible for leads is the option that assigns the user responsible for leads in the Bitrix24 system. Available options from the Bitrix24 user directory.
The registration source is an option that assigns a lead source in the Bitrix24 system. Available options from the Bitrix24 source directory.

Create a lead when creating an application in the "NeoSeo Contact Capture" module - a lead will be created only if the "NeoSeo Contact Capture" module is installed.

The source when creating an order in the "NeoSeo Contact Pickup" module is an option that assigns a lead source in the Bitrix24 system. Available options from the Bitrix24 source directory.

Create a lead when creating an application in the "NeoSeo Subscription for Goods Receipt" module - a lead will be created only if the "NeoSeo Subscription for Goods Receipt" module is installed.

The source when creating an order in the "NeoSeo Subscription for Goods Receipt" module is an option that assigns the source of the lead in the Bitrix24 system. Available options from the Bitrix24 source directory.

6. Making deals
The “Transactions” tab contains settings that are responsible for creating leads in Bitrix24. Consider each option in more detail.
Transactions are created based on orders from authorized buyers. Contacts are assigned to deals in the order (provided that contact creation is enabled in the module settings), which is created on the basis of leads. A separate transaction is created for each product from the order.
Create a deal when creating an order - a deal will be created using standard order creation methods. Values Enabled / Disabled.

The user who is responsible for the transaction - an option that assigns the user responsible for transactions in the Bitrix24 system. Available options from the Bitrix24 user directory.
The default transaction stage is applied if the order status is not selected in the correspondence table. Available options from the Bitrix24 transaction stages directory.

Default transaction type - applies if the category is not selected in the match table. Available options from the Bitrix24 transaction type directory.

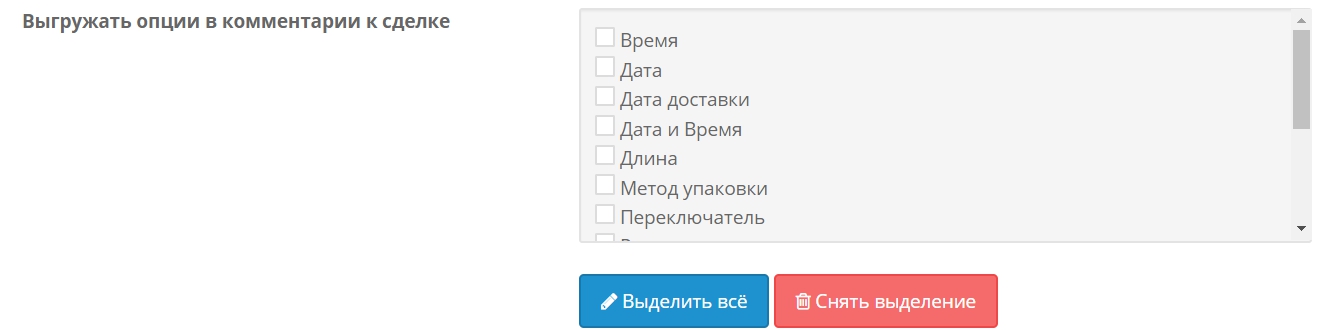
Unload options in the transaction comment - if the item has an option in the order and the option is selected in this setting, then the option will be unloaded in the transaction comment. Available options from the list of site options.
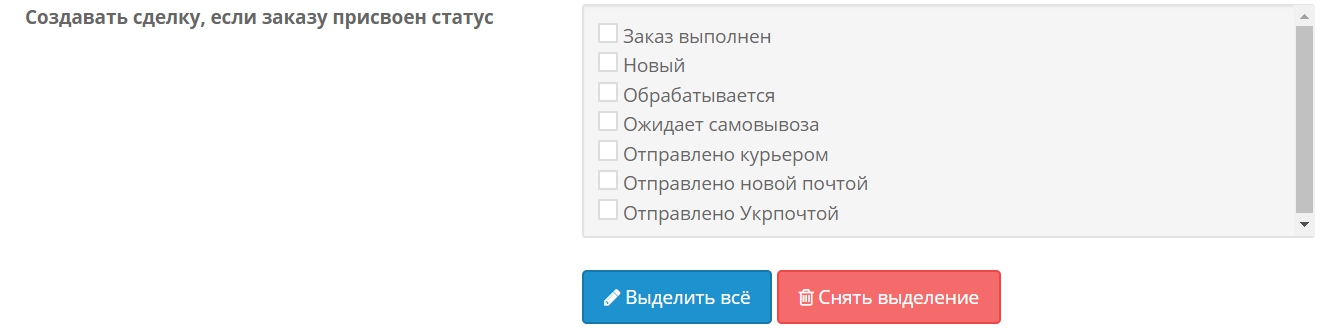
Create a deal if the order is assigned status - available options from the list of site order statuses.
Consider the advanced option “Correspondence table: Order status on the site - Stage of the transaction in Bitrix24”. This option is necessary if each order status on the website is required to match its stage of the transaction in the bitrix24 system.
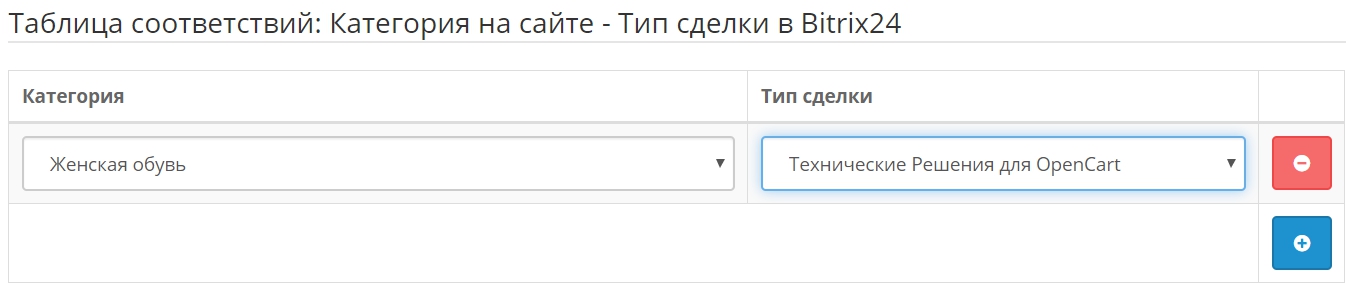
Consider the advanced option “Match table: Category on the site - Type of transaction in Bitrix24”. This option is necessary if each category of goods (main category) from the order is required to match its type of transaction in the bitrix24 system.


")

