- 1
- 2
- 3
- 4
- 5
- 6
- 7
- 8
- 9
- 10
- 11
- 12
- 13
- 14
- 15
- 16
- 17
- 18
- 19
- 20
- 21
- 22
- 23
- 24
- 25
- 26
- 27
- 28
- 29
- 30
- 31
- 32
- 33
- 34
- 35
- 36
- 37
- 38
- 39
- 40
- 41
- 42
- 43
- 44
- 45
- 46
- 47
- 48
- 49
- 50
- 51
- 52
- 53
- 54
- 55
- 56
- 57
- 58
- 59
- 60
- 61
- 62
- 63
- 64
- 65
- 66
- 67
- 68
- 69
- 70
- 71
- 72
- 73
- 74
- 75
- 76
- 77
- 78
- 79
- 80
- 81
- 82
- 83
- 84
- 85
- 86
- 87
- 88
- 89
- 90
- 91
- 92
- 93
- 94
- 95
- 96
- 97
- 98
- 99
- 100
- 101
- 102
- 103
- 104
- 105
- 106
- 107
- 108
- 109
- 110
- 111
- 112
- 113
- 114
- 115
- 116
- 117
- 118
- 119
- 120
- 121
- 122
- 123
- 124
- 125
- 126
- 127
- 128
- 129
- 130
- 131
- 132
- 133
- 134
- 135
- 136
- 137
- 138
- 139
- 140
- 141
- 142
- 143
- 144
- 145
- 146
- 147
- 148
- 149
- 150
- 151
- 152
- 153
- 154
- 155
- 156
- 157
- 158
- 159
- 160
- 161
- 162
- 163
- 164
- 165
- 166
- 167
- 168
- 169
- 170
- 171
- 172
- 173
- 174
- 175
- 176
- 177
- 178
- 179
- 180
- 181
- 182
- 183
- 184
- 185
- 186
- 187
- 188
- 189
- 190
- 191
- 192
- 193
- 194
- 195
- 196
- 197
- 198
- 199
- 200
- 201
- 202
- 203
- 204
- 205
- 206
- 207
- 208
- 209
- 210
- 211
- 212
- 213
- 214
- 215
- 216
- 217
- 218
- 219
- 220
- 221
- 222
- 223
- 224
- 225
- 226
- 227
- 228
- 229
- 230
- 231
- 232
- 233
- 234
- 235
- 236
- 237
- 238
- 239
- 240
- 241
- 242
- 243
- 244
- 245
- 246
- 247
- 248
- 249
- 250
- 251
- 252
- 253
- 254
- 255
- 256
- 257
- 258
- 259
- 260
- 261
- 262
- 263
- 264
- 265
- 266
- 267
- 268
- 269
- 270
- 271
- 272
- 273
- 274
- 275
- 276
- 277
- 278
- 279
- 280
- 281
- 282
- 283
- 284
- 285
- 286
- 287
- 288
- 289
- 290
- 291
- 292
- 293
- 294
- 295
- 296
- 297
- 298
- 299
- 300
- 301
- 302
- 303
- 304
- 305
- 306
- 307
- 308
- 309
- 310
- 311
- 312
- 313
- 314
- 315
- 316
- 317
- 318
- 319
- 320
- 321
- 322
- 323
- 324
- 325
- 326
- 327
- 328
- 329
- 330
- 331
- 332
- 333
- 334
- 335
- 336
- 337
- 338
- 339
- 340
- 341
- 342
- 343
- 344
- 345
- 346
- 347
- 348
- 349
- 350
- 351
- 352
- 353
- 354
- 355
- 356
- 357
- 358
- 359
- 360
- 361
- 362
- 363
- 364
- 365
- 366
- 367
- 368
- 369
- 370
- 371
- 372
- 373
- 374
- 375
- 376
- 377
- 378
- 379
- 380
- 381
- 382
- 383
- 384
- 385
- 386
- 387
- 388
- 389
- 390
- 391
- 392
- 393
- 394
- 395
- 396
- 397
- 398
- 399
- 400
- 401
- 402
- 403
- 404
- 405
- 406
- 407
- 408
- 409
- 410
- 411
- 412
- 413
- 414
- 415
- 416
- 417
- 418
- 419
- 420
- 421
- 422
- 423
- 424
- 425
- 426
- 427
- 428
- 429
- 430
- 431
- 432
- 433
- 434
- 435
- 436
- 437
- 438
- 439
- 440
- 441
- 442
- 443
- 444
- 445
- 446
- 447
- 448
- 449
- 450
- 451
- 452
- 453
- 454
- 455
- 456
- 457
- 458
- 459
- 460
- 461
- 462
- 463
- 464
- 465
- 466
- 467
- 468
- 469
- 470
- 471
- 472
- 473
- 474
- 475
- 476
- 477
- 478
- 479
- 480
- 481
- 482
- 483
- 484
- 485
- 486
- 487
- 488
- 489
- 490
- 491
- 492
- 493
- 494
- 495
- 496
- 497
- 498
- 499
- 500
- 501
- 502
- 503
- 504
- 505
- 506
- 507
- 508
- 509
- 510
- 511
- 512
- 513
- 514
- 515
- 516
- 517
- 518
- 519
- 520
- 521
- 522
- 523
- 524
- 525
- 526
- 527
- 528
- 529
- 530
- 531
- 532
- 533
- 534
- 535
- 536
- 537
- 538
- 539
- 540
- 541
- 542
- 543
- 544
- 545
- 546
- 547
- 548
- 549
- 550
- 551
- 552
- 553
- 554
- 555
- 556
- 557
- 558
- 559
- 560
- 561
- 562
- 563
- 564
- 565
- 566
- 567
- 568
- 569
- 570
- 571
- 572
- 573
- 574
- 575
- 576
- 577
- 578
- 579
- 580
- 581
- 582
- 583
- 584
- 585
- 586
- 587
- 588
- 589
- 590
- 591
How to effectively use the functionality of SEO filter
Содержание
-
Installing the “SEO-Filter by NeoSeo web studio”
To install the “SEO-Filter by NeoSeo web studio, you must
- Go to the administrative panel of the site and select the section “Add-ons”->”Modules”::
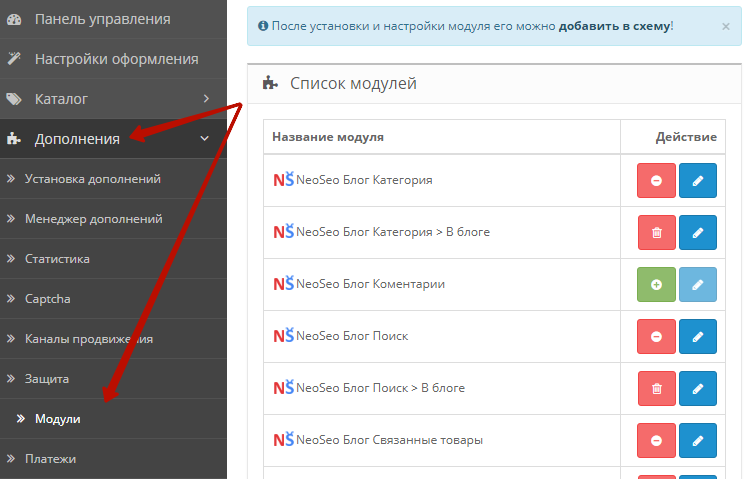
-
In the list of modules that opens, select “SEO Filter by NeoSeo Web Studio - Settings” and click the “Install” button.
.
- Go to the section "Add-ons"-> "Add-ons manager" and in the window that opens, click on the button "Update".
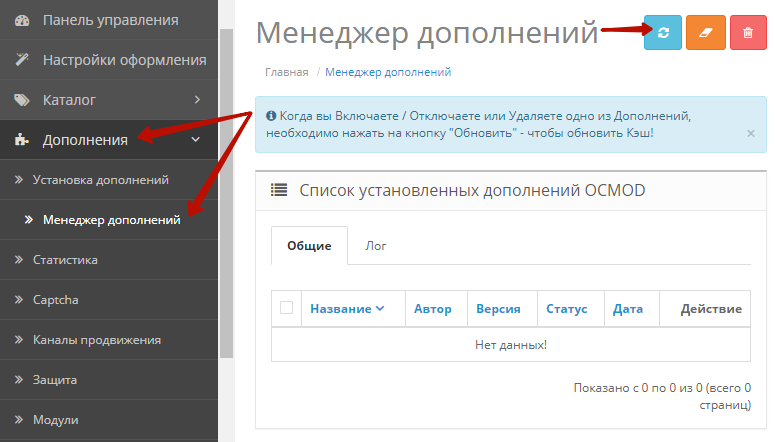
On this module installation is completed and you can proceed to editing the module
-
Editing the settings of the “SEO-Filter by NeoSeo web studio - Settings” module
This module is designed to adjust general filter settings. To edit the module settings, you need to go to the site's administrative panel and select the "Add-ons"->"Modules" section. In the list of modules that opens, select “SEO-Filter from NeoSeo-Settings Web Studio” and click on the “Edit” button:
After that, a window for editing module settings will appear on the screen:
The “General” tab is intended for setting the following parameters:
- Use cache. If, during module operation, it is necessary to use the cache, in the “Use cache”, select the “Enabled”:

This module allows you to clear the filter cache. To do this, click on the button "Reset filter cache":
- Use discounts. If it is necessary that when filtering goods by price, the price of the goods is used, taking into account the “Discounts”::
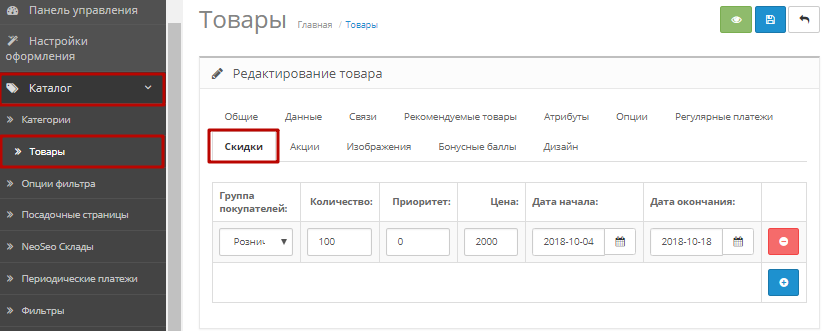
In this field, select “Enabled”:
- Use promotions. If it is necessary that when filtering goods by price, the price of the goods is used, taking into account the tab “Promotion”:

In this field, select the value “Enabled”:
- Show options as attributes on the product page. How does it work? For example, we use the option that filters the product by color, tone. Accordingly, for each product, the color of this product is selected in the value of the filter option:

When viewing a product card, the “Color, tone” attribute will appear in its characteristics:
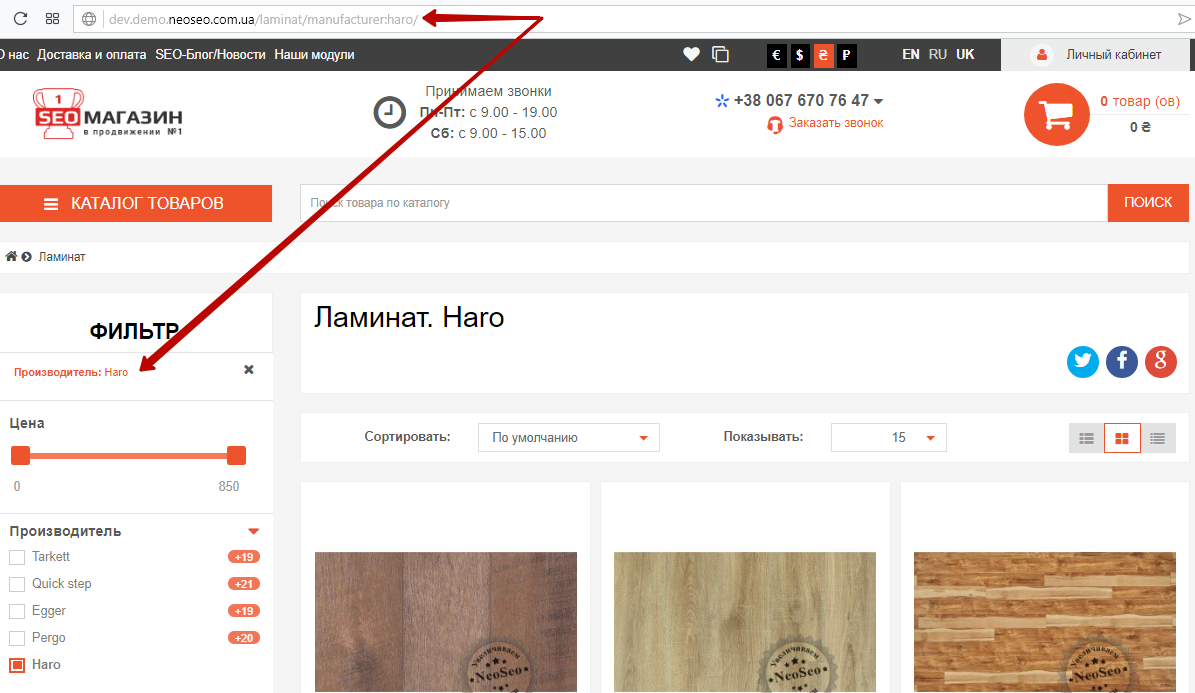
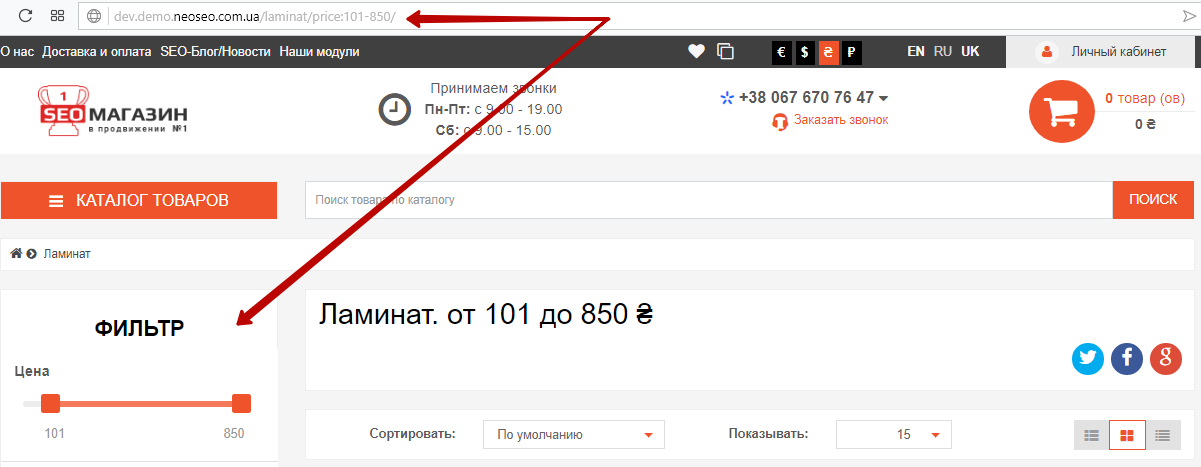
- Add the selected filters to the category name. If you want to add the selected filter value to the category name, in this field, select “Enabled”:

For example, in the “Laminate” category, in the “Manufacturer” option, select the “Haro” value. As a result, the category name will change to “Laminate. Haro”:

-
Attribute group. In this field, you must select an attribute group to display filter options. In this case, there are two groups: “General”, “Shoes”:

-
General URL of the manufacturer in the filter. This field is used to specify the url of the manufacturer in the filter in all store languages. Please note that the link must be in Latin. For example, let's specify the manufacturer's link “Manufacturer”:

-
General price link in the filter. This field is used to specify the price url in the filter in all store languages. Please note that the link must be in Latin. For example, let's specify the price link “Price”:

- In addition, this module allows you to: clear installed filter options, copy existing attributes and options, export filter options from OCFilter:

-
Editing the settings of the “SEO-Filter module by NeoSeo” web studio
To edit the module settings, go to the site's admin panel and select the “Add-ons”->”Modules” section. In the list of modules that opens, select “SEO-Filter by NeoSeo”web studio and click on the “Edit”:
After that, a window for editing the module settings will appear on the screen: seo-filter.png" style="margin: 10px; width: 500px;" />
The “General” tab is used to configure the following settings:
-
Status. In order to connect this module to the store, you need to select the value in the “Status” field >“Enabled”:

-
Name. For each category, the module allows you to create a filter with your own configuration. For example, let's create a filter that will be displayed in all categories and name it “Filter in categories”:

-
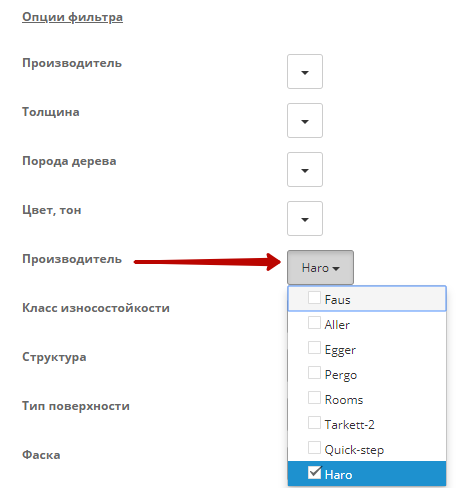
Manufacturer. This module allows you to filter not only by price, but also by manufacturer. In order to filter by manufacturer, in the “Manufacturer” field, select the value “Enabled”:

-
Producer header. This field allows you to add a title for the “Manufacturer” option for all store languages (in this case, for English, Russian and Ukrainian):

-
Title. This field allows you to add a title for the block in which the options will be displayed. The module allows you to add a block title for all store languages (in this case, for English, Russian and Ukrainian). For example, let's add the block header “Filter”:

Important!!! After adding all the changes, you must click the “Save”:
After saving the module settings, go to the site administration panel and select the “Add-ons”->”Modules” section. “Seo-Filter by NeoSeo->Filter in categories”:
Now this module can be connected to any page of the site. To do this, go to the site administration panel and select the section “Design”->”Schemes”. In the list of schemes, select the scheme to which you want to add a filter and click the “Edit” button. For this example, let's choose the scheme “Category”:
In the scheme editing window, click on the button “Add module”:
In the list of modules, select “SEO-Filter from NeoSeo web studio->Filter in categories”, in the “Location” column, select the desired location of the block and set the sort order: margin: 10px; width: 700px;" />
After making all the changes, click on the “Save” button:
As a result, a filter by price and manufacturer will be available for each category:
-
Creating filter options
This module allows you to add new filter options. After installing the module, in the site administration panel, in the “Catalog” section, a new menu item “Filter options”:
This section allows you to add new options, edit and delete existing ones, and search for the necessary options.
To add a new option, in the “Filter Options” section, click on the “Add” button:
After that, a window for editing the option settings will appear on the screen: filtra.png" style="margin: 10px; width: 600px;" />
When adding a new option, the module allows you to configure the following fields:
-
Status. To connect this option to the store, in the field “Status”, select the value &ldquo ;Enabled”:

-
Section status. Use this field to select whether the filter section will be opened or closed:

When the filter section is enabled, the option values are displayed automatically: .png" style="margin: 10px 35px; width: 260px;" />
And when the filter section is disabled, the option values are displayed when you click on the option:
- Option type. This module provides three types of options: tile, checkbox and radiobox: seo-filtra.png" style="margin: 10px; width: 260px;" />
For example, let's choose the option type “Tile”:
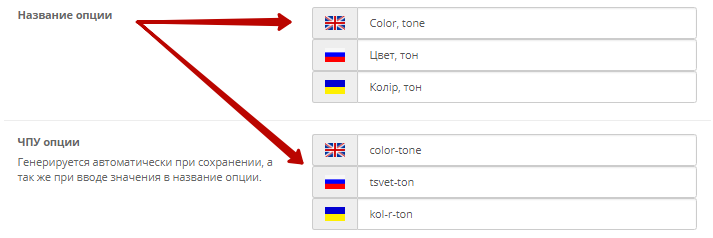
- Option name. This field is for entering the option name. The field is multilingual, i.e. allows you to add the name of the option for all languages of the store (in this case, for English, Russian and Ukrainian). For example, let's create an option that will filter products by their color (tone), called “Color, tone”:

Please note!!! This module automatically generates CNC options based on the option name:
-
Sort order. This field is used to set the ordinal number of the option when displayed on the page. For example, let's display the option “Color, tone” first in the list:

-
Categories. Use this field to select the categories in which the option will be displayed:

-
Additional styling. The module allows you to use color and an image as values for filter options. For example, let's create an option that filters a product by its color. To do this, in the “Additional design” field, select the value “Color”:

-
Option values. To add new option values, click on the button “Add option value”:

By default, the form for adding an option value contains the following fields: “Option value name”, “NC”, “Sort order”:
When “Color” is selected in the “Additional Appearance” field, the “Color” field is added in the add option value form: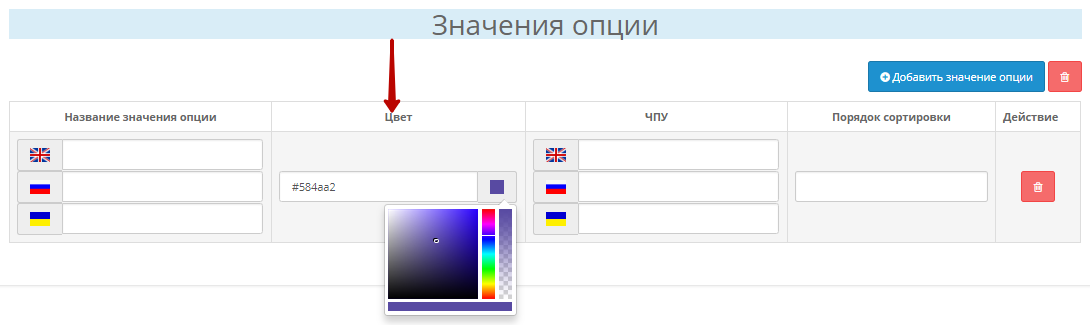
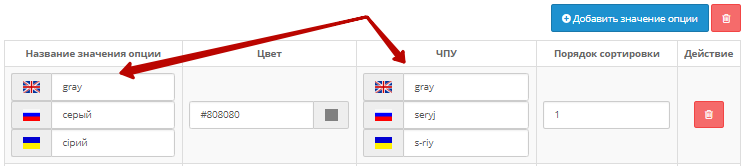
For an example, let's add several values of the option that filters products by color, tone: /opcii-filtra-po-cvetu.png" style="margin: 10px; width: 700px;" />
Please note!!! The option value CNC is automatically generated based on the option value name:
As a result, we get an option that filters the product by the selected colors:
Important!!! After adding all the changes, you must click the button “Save”:

Using this module, you can create an option that filters a product by image. For example, let's create a new option and in the field “Additional appearance” select the value “Image”:
In the filter option value, you can now select an image and its position relative to the text.
As a result, we get an option that filters the product by country of origin:
With such module capabilities, you can create a huge number of options that will help the user find the right product faster. For example, select a laminate surface according to its image: .png" style="margin: 10px 110px; width: 260px;" />
-
Creating landing pages
This module allows you to create landing pages based on the intersection of categories and filters. After installing the module, in the site administration panel, in the “Catalog” section, a new menu item “Landing pages” is available:
This section allows you to add new landing pages, edit and delete existing ones, as well as search for the necessary landing pages.
To add a new landing page, in the “Landing Pages” section, click on the “Add” button:
After that, a window for editing the landing page settings will appear on the screen: -stranicy.png" style="margin: 10px; width: 600px;" />
When adding a new landing page, the module allows you to configure the following fields:
-
Status. To connect the landing page to the store, in the field “Status”, select the value “Enabled”:

-
Category. Using this field, you can select the required category based on which the landing page will be created:

-
Filter options. Using this field, you can select the required option and the value of this option, based on which the landing page will be created:
 ;
; -
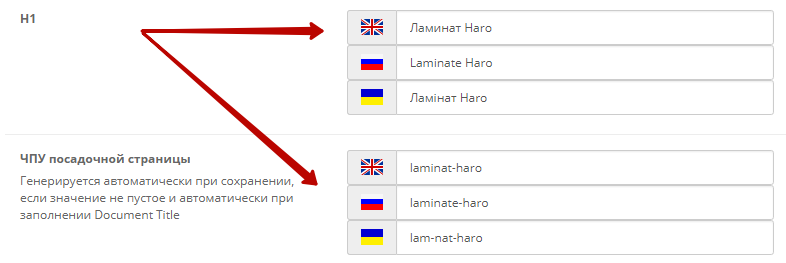
Title. This field is used to enter the title of the landing page, in all store languages:

Pay attention!!! After entering the title, the CNC landing page is generated automatically:
- Landing page settings allow you to add special meta tags title, description, keywords:

As a result, we get the following page code:

- Description. This field is required to add a description of the landing page, in all store languages:

After saving all the necessary settings, we get the following landing page:


