- 1
- 2
- 3
- 4
- 5
- 6
- 7
- 8
- 9
- 10
- 11
- 12
- 13
- 14
- 15
- 16
- 17
- 18
- 19
- 20
- 21
- 22
- 23
- 24
- 25
- 26
- 27
- 28
- 29
- 30
- 31
- 32
- 33
- 34
- 35
- 36
- 37
- 38
- 39
- 40
- 41
- 42
- 43
- 44
- 45
- 46
- 47
- 48
- 49
- 50
- 51
- 52
- 53
- 54
- 55
- 56
- 57
- 58
- 59
- 60
- 61
- 62
- 63
- 64
- 65
- 66
- 67
- 68
- 69
- 70
- 71
- 72
- 73
- 74
- 75
- 76
- 77
- 78
- 79
- 80
- 81
- 82
- 83
- 84
- 85
- 86
- 87
- 88
- 89
- 90
- 91
- 92
- 93
- 94
- 95
- 96
- 97
- 98
- 99
- 100
- 101
- 102
- 103
- 104
- 105
- 106
- 107
- 108
- 109
- 110
- 111
- 112
- 113
- 114
- 115
- 116
- 117
- 118
- 119
- 120
- 121
- 122
- 123
- 124
- 125
- 126
- 127
- 128
- 129
- 130
- 131
- 132
- 133
- 134
- 135
- 136
- 137
- 138
- 139
- 140
- 141
- 142
- 143
- 144
- 145
- 146
- 147
- 148
- 149
- 150
- 151
- 152
- 153
- 154
- 155
- 156
- 157
- 158
- 159
- 160
- 161
- 162
- 163
- 164
- 165
- 166
- 167
- 168
- 169
- 170
- 171
- 172
- 173
- 174
- 175
- 176
- 177
- 178
- 179
- 180
- 181
- 182
- 183
- 184
- 185
- 186
- 187
- 188
- 189
- 190
- 191
- 192
- 193
- 194
- 195
- 196
- 197
- 198
- 199
- 200
- 201
- 202
- 203
- 204
- 205
- 206
- 207
- 208
- 209
- 210
- 211
- 212
- 213
- 214
- 215
- 216
- 217
- 218
- 219
- 220
- 221
- 222
- 223
- 224
- 225
- 226
- 227
- 228
- 229
- 230
- 231
- 232
- 233
- 234
- 235
- 236
- 237
- 238
- 239
- 240
- 241
- 242
- 243
- 244
- 245
- 246
- 247
- 248
- 249
- 250
- 251
- 252
- 253
- 254
- 255
- 256
- 257
- 258
- 259
- 260
- 261
- 262
- 263
- 264
- 265
- 266
- 267
- 268
- 269
- 270
- 271
- 272
- 273
- 274
- 275
- 276
- 277
- 278
- 279
- 280
- 281
- 282
- 283
- 284
- 285
- 286
- 287
- 288
- 289
- 290
- 291
- 292
- 293
- 294
- 295
- 296
- 297
- 298
- 299
- 300
- 301
- 302
- 303
- 304
- 305
- 306
- 307
- 308
- 309
- 310
- 311
- 312
- 313
- 314
- 315
- 316
- 317
- 318
- 319
- 320
- 321
- 322
- 323
- 324
- 325
- 326
- 327
- 328
- 329
- 330
- 331
- 332
- 333
- 334
- 335
- 336
- 337
- 338
- 339
- 340
- 341
- 342
- 343
- 344
- 345
- 346
- 347
- 348
- 349
- 350
- 351
- 352
- 353
- 354
- 355
- 356
- 357
- 358
- 359
- 360
- 361
- 362
- 363
- 364
- 365
- 366
- 367
- 368
- 369
- 370
- 371
- 372
- 373
- 374
- 375
- 376
- 377
- 378
- 379
- 380
- 381
- 382
- 383
- 384
- 385
- 386
- 387
- 388
- 389
- 390
- 391
- 392
- 393
- 394
- 395
- 396
- 397
- 398
- 399
- 400
- 401
- 402
- 403
- 404
- 405
- 406
- 407
- 408
- 409
- 410
- 411
- 412
- 413
- 414
- 415
- 416
- 417
- 418
- 419
- 420
- 421
- 422
- 423
- 424
- 425
- 426
- 427
- 428
- 429
- 430
- 431
- 432
- 433
- 434
- 435
- 436
- 437
- 438
- 439
- 440
- 441
- 442
- 443
- 444
- 445
- 446
- 447
- 448
- 449
- 450
- 451
- 452
- 453
- 454
- 455
- 456
- 457
- 458
- 459
- 460
- 461
- 462
- 463
- 464
- 465
- 466
- 467
- 468
- 469
- 470
- 471
- 472
- 473
- 474
- 475
- 476
- 477
- 478
- 479
- 480
- 481
- 482
- 483
- 484
- 485
- 486
- 487
- 488
- 489
- 490
- 491
- 492
- 493
- 494
- 495
- 496
- 497
- 498
- 499
- 500
- 501
- 502
- 503
- 504
- 505
- 506
- 507
- 508
- 509
- 510
- 511
- 512
- 513
- 514
- 515
- 516
- 517
- 518
- 519
- 520
- 521
- 522
- 523
- 524
- 525
- 526
- 527
- 528
- 529
- 530
- 531
- 532
- 533
- 534
- 535
- 536
- 537
- 538
- 539
- 540
- 541
- 542
- 543
- 544
- 545
- 546
- 547
- 548
- 549
- 550
- 551
- 552
- 553
- 554
- 555
- 556
- 557
- 558
- 559
- 560
- 561
- 562
- 563
- 564
- 565
- 566
- 567
- 568
- 569
- 570
- 571
- 572
- 573
- 574
- 575
- 576
- 577
- 578
- 579
- 580
- 581
- 582
- 583
- 584
- 585
- 586
- 587
- 588
- 589
- 590
- 591
Setting up the module "NeoSeo Quick sitemap" for the online store {SEO-Shop}, OpenCart 2.x, 3.x, ocStore
1. Installing “NeoSeo Quick Sitemap”
In order to install the module “NeoSeo Quick Sitemap” for OpenCart you need :
- Go to the site's admin panel and select the section“Add-ons”->”Promotion channels”:

- In the list of modules that opens, select “NeoSeo Sitemap” and click the button“Install”:

- Go to section “Additions”->”Manager additions” and in the window that opens, click on the “Update” button.

Note: this example describes how to install the Quick Sitemap module for OpenCart version 2.1. If you are using a module of a different version, read the installation instructions in the readme.txt file in the module archive.
- Edit the file .htacesss.
.htacesss is located at the root of your site. In this file, you need to find the line:
RewriteRule ^sitemap.xml$ index.php?route=feed/google_sitemap[L]
And replace it with the following two lines:
RewriteRule ^sitemap.xml$ index.php?route=feed/neoseo_fast_sitemap [L]
RewriteRule ^sitemap([^\.]+).xml$ index.php?route=feed/neoseo_fast_sitemap&path=$1 [L
- Edit the file index.php.
index.php is located at the root of your site. In this file, you need to find the line:
// Front Controller
$controller = new Front($registry);
After this line, add the following code:
if( isset($request->get["route"]) && $request->get["route"] == "feed/neoseo_fast_sitemap" ) {
if (!$seo_type = $config->get('config_seo_url_type')) {
$seo_type = 'seo_url';
}
$seoFile = DIR_APPLICATION . 'controller/common/' . str_replace(array('../', '..', '..'), '', $seo_type ) . '.php';
if (file_exists($seoFile)) {
require_once($seoFile);
$seoClass = 'ControllerCommon' . preg_replace('/[^a-zA-Z0-9]/', '', $seo_type);
$seoController = new $seoClass($registry);
$url->addRewrite($seoController);
}
$action = new Action($request->get['route']);
$controller->dispatch($action, new Action('error/not_found'));
$response->output();
return;
}
This completes the installation of the module and you can proceed to editing the module settings.
2. Editing module settings
To edit module settings, go to the site's admin panel and select “Add-ons”->”Promotion channels”. In the list of modules that opens, select “NeoSeo Sitemap” and click on the button “Edit”:
After that, a window for editing the module settings will appear on the screen: : 10px;width: 800px" />
The Settings tab is intended for setting the following parameters:
- Enable/disable the module. In order to connect the module to the store, you need to set the “Status” field to “Enabled”< /strong>:

- CNC generation system. Using this field, you can select the CNC generation method: Seo Pro or Seo Url:

- Hide the full path in the CNC of categories and products. If you select “Disabled” for this field, we get the full path in the CNC of categories and products. For example:

If you select “Enabled” the full path in the CNC of categories and products will be hidden:
- Multi-language CNC. When this option is enabled, the sitemap will display the CNC for the languages your store supports.
This is how the site map of a store that supports Ukrainian, Russian and English languages looks like: margin: 10px;width: 500px" />
If this option is disabled, the sitemap will display the CNC for the default language:
- Split the sitemap into parts. If this option is enabled, the sitemap will be split into parts. The size of the map part will depend on the value entered in the field “Map part size”.
For example, if the option Split the map into parts is enabled, and the value 10 is entered in the Map part size field, then the sitemap will be broken into pieces of size 10:
 < /p>
< /p>
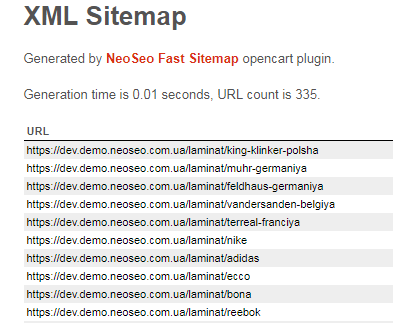
Then the sitemap after splitting will look like this:

Go to the link:
As a result, we see that product-1 contains 10 links:

- Multistore. If this option is enabled, the sitemap will be available for the multistore:

- Compression. If you want to compress the sitemap, select one of the following options in the “Compression” option:

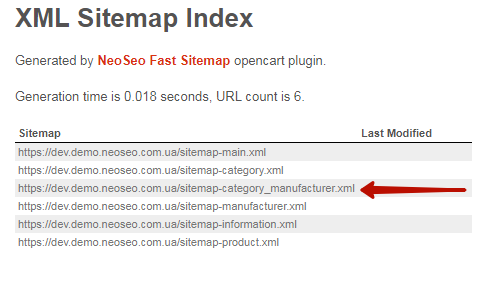
- Link to sitemap.xml. This field automatically generates a link to a sitemap for your store:

Copying this will take you to the store sitemap:

Important!!! After adding all the changes, you must click the “Save” :

The “Shop” tab is divided into 4 sections: “Information”, “Category”, “Manufacturer”, “Product”:< br /> 
The “Information” section includes the following parameters:
- Display in sitemap. If “Display in sitemap” is set to “Enabled”, then the sitemap will contain a link to the page “Information”:

- Frequency of updates. By default, the frequency for updating site information is “Weekly” (weekly). If necessary, enter the desired update frequency in this field: never - never, yearly - once a year, monthly< /strong> - monthly, weekly - weekly, daily - daily, hourly - hourly, always - always.

- Update priority. By default, the site information update priority is “1” (highest). If necessary, enter in this field is the desired update priority in the range 1.00 to 0.1.

 < /p>
< /p>
Important!!! After adding all the changes, you must click the “Save” .
The “Category” section includes the following options:
- Display in sitemap. If “Display in sitemap” is “Enabled” , then the sitemap will contain a link to the page “Categories”:


- Categories with brands. When this option is enabled, a category/brand type link will be generated in the sitemap:
When clicking on this link, we get links like category/brand:

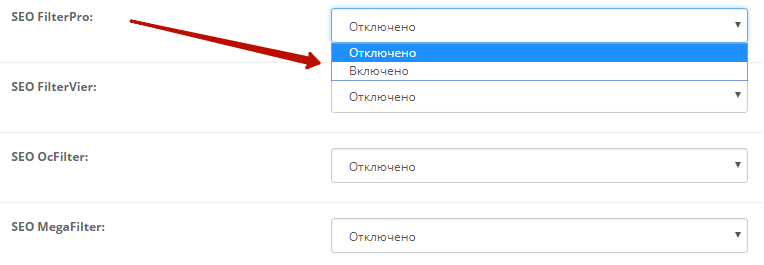
This module allows you to enable various SEO filters: SEO FilterPro, SEO FilterVier, SEO OcFilter, SEO MegaFilter. To do this, select “Enabled” .

- NeoSeo Landing pages. To add links to landing pages, select “Enabled” in this field.

As a result, the sitemap will contain the created store landing pages:

- Date modified. To add the date when categories were last updated, select “Enabled”.


- Frequency of updates. By default, the frequency for updating site categories is “Weekly” (weekly). If necessary, enter the desired update frequency in this field: never - never, yearly - once a year, monthly< /strong> - monthly, weekly - weekly, daily - daily, hourly - hourly, always - always.
- Update priority. By default, the site categories update priority is set to 0.7. If necessary, enter the desired update priority in this field in the range of 1.00 (the most high) to 0.1 (lowest).


Important!!! After adding all the changes, you must click the “Save” .
The “Manufacturer” section includes the following parameters:
- Display in sitemap. If “Display in sitemap” is “Enabled” , then the sitemap will contain a link to the page “Manufacturers”:


- Manufacturers - Lines by T1ma (additional module). To add manufacturers - lines by T1ma, select “Enabled”:< br />

- Frequency of updates. By default, the update frequency of site producers is “Weekly” (weekly). If necessary, enter the desired update frequency in this field: never - never, yearly - once a year, monthly - monthly, weekly - weekly, daily - daily, hourly - hourly, always - always.
- Update priority. By default, the site producers' update priority is 0.7. If necessary, enter the desired update priority in this field in the range 1.00 (the highest ) to 0.1 (lowest).


The “Product” section includes the following parameters:
- Display in sitemap. If “Display in sitemap” is “Enabled” , then the sitemap will contain a link to the page “Product”:


- Date modified. To add the date when products were last updated, select “Enabled”.
- Frequency of updates. By default, the frequency of updating the site's products is “Weekly” (weekly). If necessary, enter the desired update frequency in this field: never - never, yearly - once a year, monthly< /strong> - monthly, weekly - weekly, daily - daily, hourly - hourly, always - always.
- Update priority. By default, the site product update priority is 0.7. If necessary, enter the desired update priority in this field in the range 1.00 (the highest ) до 0.1 (самый низкий).
< /li>


The “Blog” tab is divided into 4 sections: “Modules”, “Categories”, “Authors”, “Articles”.

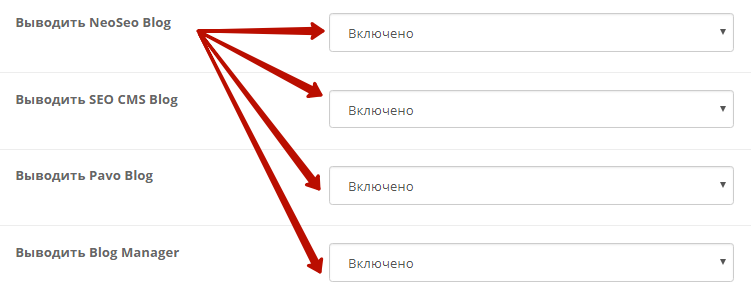
Section “Modules” connect the following modules:“NeoSeo Blog”, “SEO CMS Blog”, “Pavo Blog”, “Blog Manager”:< /strong>

For example, let's connect the module “NeoSeo Blog”:

As a result, links to blogs from the module “NeoSeo Blog” (Blog category and blog author) were added to the sitemap:


The “Categories” section includes the following options:
- Display in sitemap. If “Display in sitemap” is set to “Enabled”, then the sitemap will contain a link to the page “Blog Category”:


- Date modified. To add the date when the blogs were last updated, select “Enabled”.
- Frequency of updates. By default, blog updates are set to “Weekly” (weekly). If necessary, enter the desired update frequency in this field: never - never, yearly - once a year, monthly< /strong> - monthly, weekly - weekly, daily - daily, hourly - hourly, always - always.
- Update priority. By default, the blog update priority is set to 0.7. If necessary, enter the desired update priority in this field in the range of 1.00 (the highest ) to 0.1 (lowest).


The “Authors” section includes the following parameters:
- Display in sitemap. If “Display in sitemap” is set to “Enabled”, then the sitemap will contain a link to the page “Author Blog”:


- Date modified. To add the date when blogs were last updated, select “Enabled”.
- Update frequency. By default, the blog update frequency is “Weekly” (weekly). If necessary, enter the desired update frequency in this field: never - never, yearly - once a year, monthly< /strong> - monthly, weekly - weekly, daily - daily, hourly - hourly, always - always.
- Update priority. By default, the site's blogs update priority is 0.7. If necessary, enter the desired update priority in this field in the range 1.00 (the highest ) to 0.1 (lowest).

The “Articles” section includes the following options:
- Display in sitemap. If the field “Display in sitemap” is set to “Enabled”, then the sitemap will contain link to page “Blog-articles”:

- Date modified. To add the date when articles were last updated, select “Enabled”.
- Frequency of updates. By default, the frequency for updating articles is “Weekly” (weekly). If necessary, enter the desired update frequency in this field: never - never, yearly - once a year, monthly< /strong> - monthly, weekly - weekly, daily - daily, hourly - hourly, always - always.
- Update priority. By default, the site product update priority is 0.7. If necessary, enter the desired update priority in this field in the range 1.00 (the highest ) to 0.1 (lowest).


Comments