- 1
- 2
- 3
- 4
- 5
- 6
- 7
- 8
- 9
- 10
- 11
- 12
- 13
- 14
- 15
- 16
- 17
- 18
- 19
- 20
- 21
- 22
- 23
- 24
- 25
- 26
- 27
- 28
- 29
- 30
- 31
- 32
- 33
- 34
- 35
- 36
- 37
- 38
- 39
- 40
- 41
- 42
- 43
- 44
- 45
- 46
- 47
- 48
- 49
- 50
- 51
- 52
- 53
- 54
- 55
- 56
- 57
- 58
- 59
- 60
- 61
- 62
- 63
- 64
- 65
- 66
- 67
- 68
- 69
- 70
- 71
- 72
- 73
- 74
- 75
- 76
- 77
- 78
- 79
- 80
- 81
- 82
- 83
- 84
- 85
- 86
- 87
- 88
- 89
- 90
- 91
- 92
- 93
- 94
- 95
- 96
- 97
- 98
- 99
- 100
- 101
- 102
- 103
- 104
- 105
- 106
- 107
- 108
- 109
- 110
- 111
- 112
- 113
- 114
- 115
- 116
- 117
- 118
- 119
- 120
- 121
- 122
- 123
- 124
- 125
- 126
- 127
- 128
- 129
- 130
- 131
- 132
- 133
- 134
- 135
- 136
- 137
- 138
- 139
- 140
- 141
- 142
- 143
- 144
- 145
- 146
- 147
- 148
- 149
- 150
- 151
- 152
- 153
- 154
- 155
- 156
- 157
- 158
- 159
- 160
- 161
- 162
- 163
- 164
- 165
- 166
- 167
- 168
- 169
- 170
- 171
- 172
- 173
- 174
- 175
- 176
- 177
- 178
- 179
- 180
- 181
- 182
- 183
- 184
- 185
- 186
- 187
- 188
- 189
- 190
- 191
- 192
- 193
- 194
- 195
- 196
- 197
- 198
- 199
- 200
- 201
- 202
- 203
- 204
- 205
- 206
- 207
- 208
- 209
- 210
- 211
- 212
- 213
- 214
- 215
- 216
- 217
- 218
- 219
- 220
- 221
- 222
- 223
- 224
- 225
- 226
- 227
- 228
- 229
- 230
- 231
- 232
- 233
- 234
- 235
- 236
- 237
- 238
- 239
- 240
- 241
- 242
- 243
- 244
- 245
- 246
- 247
- 248
- 249
- 250
- 251
- 252
- 253
- 254
- 255
- 256
- 257
- 258
- 259
- 260
- 261
- 262
- 263
- 264
- 265
- 266
- 267
- 268
- 269
- 270
- 271
- 272
- 273
- 274
- 275
- 276
- 277
- 278
- 279
- 280
- 281
- 282
- 283
- 284
- 285
- 286
- 287
- 288
- 289
- 290
- 291
- 292
- 293
- 294
- 295
- 296
- 297
- 298
- 299
- 300
- 301
- 302
- 303
- 304
- 305
- 306
- 307
- 308
- 309
- 310
- 311
- 312
- 313
- 314
- 315
- 316
- 317
- 318
- 319
- 320
- 321
- 322
- 323
- 324
- 325
- 326
- 327
- 328
- 329
- 330
- 331
- 332
- 333
- 334
- 335
- 336
- 337
- 338
- 339
- 340
- 341
- 342
- 343
- 344
- 345
- 346
- 347
- 348
- 349
- 350
- 351
- 352
- 353
- 354
- 355
- 356
- 357
- 358
- 359
- 360
- 361
- 362
- 363
- 364
- 365
- 366
- 367
- 368
- 369
- 370
- 371
- 372
- 373
- 374
- 375
- 376
- 377
- 378
- 379
- 380
- 381
- 382
- 383
- 384
- 385
- 386
- 387
- 388
- 389
- 390
- 391
- 392
- 393
- 394
- 395
- 396
- 397
- 398
- 399
- 400
- 401
- 402
- 403
- 404
- 405
- 406
- 407
- 408
- 409
- 410
- 411
- 412
- 413
- 414
- 415
- 416
- 417
- 418
- 419
- 420
- 421
- 422
- 423
- 424
- 425
- 426
- 427
- 428
- 429
- 430
- 431
- 432
- 433
- 434
- 435
- 436
- 437
- 438
- 439
- 440
- 441
- 442
- 443
- 444
- 445
- 446
- 447
- 448
- 449
- 450
- 451
- 452
- 453
- 454
- 455
- 456
- 457
- 458
- 459
- 460
- 461
- 462
- 463
- 464
- 465
- 466
- 467
- 468
- 469
- 470
- 471
- 472
- 473
- 474
- 475
- 476
- 477
- 478
- 479
- 480
- 481
- 482
- 483
- 484
- 485
- 486
- 487
- 488
- 489
- 490
- 491
- 492
- 493
- 494
- 495
- 496
- 497
- 498
- 499
- 500
- 501
- 502
- 503
- 504
- 505
- 506
- 507
- 508
- 509
- 510
- 511
- 512
- 513
- 514
- 515
- 516
- 517
- 518
- 519
- 520
- 521
- 522
- 523
- 524
- 525
- 526
- 527
- 528
- 529
- 530
- 531
- 532
- 533
- 534
- 535
- 536
- 537
- 538
- 539
- 540
- 541
- 542
- 543
- 544
- 545
- 546
- 547
- 548
- 549
- 550
- 551
- 552
- 553
- 554
- 555
- 556
- 557
- 558
- 559
- 560
- 561
- 562
- 563
- 564
- 565
- 566
- 567
- 568
- 569
- 570
- 571
- 572
- 573
- 574
- 575
- 576
- 577
- 578
- 579
- 580
- 581
- 582
- 583
- 584
- 585
- 586
- 587
- 588
- 589
- 590
- 591
Module installation “NeoSeo checkout” for OpenCart
Content
2.1. Configuring the main module parameters
2.2. Setting fields for the Buyer block
2.3. Setting up the Payment Methods block
2.4. Setting up the Delivery methods block
2.5. Configuring shipping types
2.6. Configuring payment method dependencies on shipping methods
1. Installing the module “NeoSeo One-page simple checkout”
To install module “NeoSeo One Page Simple Checkout” for OpenCart required:
- Go to the site's admin panel and select “Add-ons”->”Modules”:
- In the list of modules that opens, select “NeoSeo One Page Easy Checkout” and click “Install”:

- Go to “Add-ons”->”Add-ons Manager” and in the window that opens, click on the “Update”:


This completes the installation of the module and you can proceed to editing the module settings.
2. Editing module settings
To edit the module settings, go to the site's admin panel and select the “Add-ons”->”Modules section. In the list of modules that opens, select “NeoSeo One-Page Easy Checkout” for OpenCart and click on the button “Edit”:

After that, a window for editing module settings will appear on the screen:

2.1. Configuring the main module parameters
Tab “Basic” is intended for setting the following options:
- Status. select value “Enabled”:

- Require acceptance of the terms of the agreement. The values of this field are the list of articles created on your site in the “Catalog – Articles”. If, when placing an order, the client must accept any terms of the agreement, then for this it is necessary to create an appropriate article in the section “Catalog – Articles”. After that, the created article must be selected in this field.
For example, let's create an article “User Agreement” and select it in the module settings:
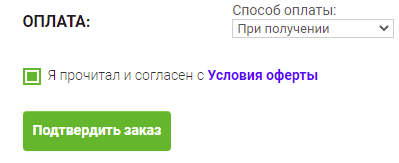
As a result, on the checkout page, before clicking on the “Confirm Order” button, the client will need to confirm (tick) that he is familiar with the selected article. 
Otherwise, the order cannot be placed.
If there is no need to require the client to accept the terms of the agreement when placing an order, then select the value "Disabled" in this field.
- Initial value for the "I accept the agreement" checkbox. This field accepts the following values:
- Enabled. In this case, the checkbox next to the text "I have read and agree to the terms of the agreement" will be set by default:
- Disabled. In this case, the checkbox next to the text "I have read and agree to the terms of the agreement" will not be set by default:

- Display requirements as text. This field accepts the following values:
- Enabled. In this case, the text of the article that is selected in the field “Require acceptance of the terms of the agreement” will be displayed on the checkout page:

- Disabled. In this case, only the link to the article that is selected in the "Require acceptance of the terms of the agreement" field will be displayed:
- Check if there is a product in the cart. This field accepts the following values:
- Enabled. If the product that the client wants to purchase is not available in the required quantity, then when you click on the "Place an order" button; in the cart, a notification will be displayed that the item cannot be purchased in the specified quantity:

- Disabled. When you click on the "Place an order" button the customer will be redirected to the checkout page even if the selected product is not available in the store in the required quantity.
- Minimum order amount. This field is used to indicate the minimum order value at which it is possible to place an order.
For example, let's set the value of this field – 2000. As a result, when going to the payment step, the following notification will be displayed for the client: ; height: 298px;" /> - Concise output.

When this option is enabled, the checkout page will have a compact output, when disabled – normal view.
- Abandoned cart message template.

In this field, it is possible to select a template for the abandoned cart message that will be sent to the buyer's mail if the checkout was not completed. The dropped_cart.tpl template is stored at admin/view/template/mail/neoseo_checkout. If you add another template to connect it, you need to place it in the above directory, after that it will be displayed in the drop-down list of this option.
- Abandoned cart message subject.

In this field, you can set the subject of the abandoned cart email that will be sent to the buyer's email in case of an incomplete checkout.
- 1 step styling.

If this option is enabled, to place an order, you will need to enter contact details, as well as specify the method of delivery and payment on the same page: 
If you disable this option, the input of contact details and the method of delivery and payment will be divided into 2 steps: 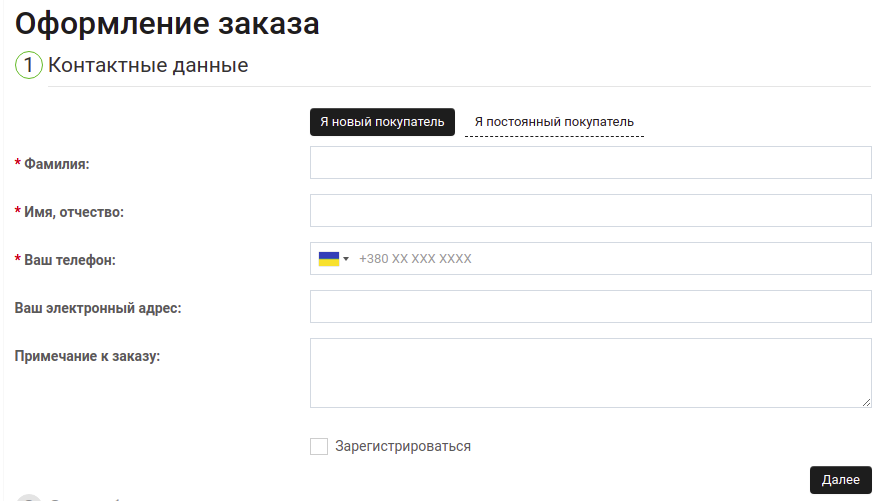
- Redirect from cart to checkout.

If this option is set to “Enabled”, then when you click on the “Open Cart” automatically redirected to the checkout page, otherwise the cart page will open: 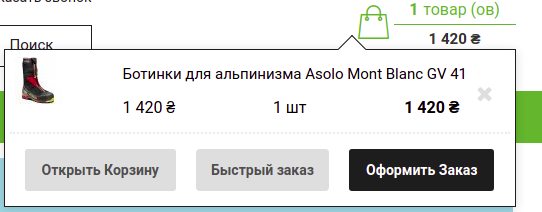
- Hide menu during checkout. If this option is disabled, the main menu will be displayed on the checkout page.
Enabling this option will hide the main menu on the checkout page: 
- Hide footer during checkout.
If this option is disabled, a footer will be displayed on the checkout page: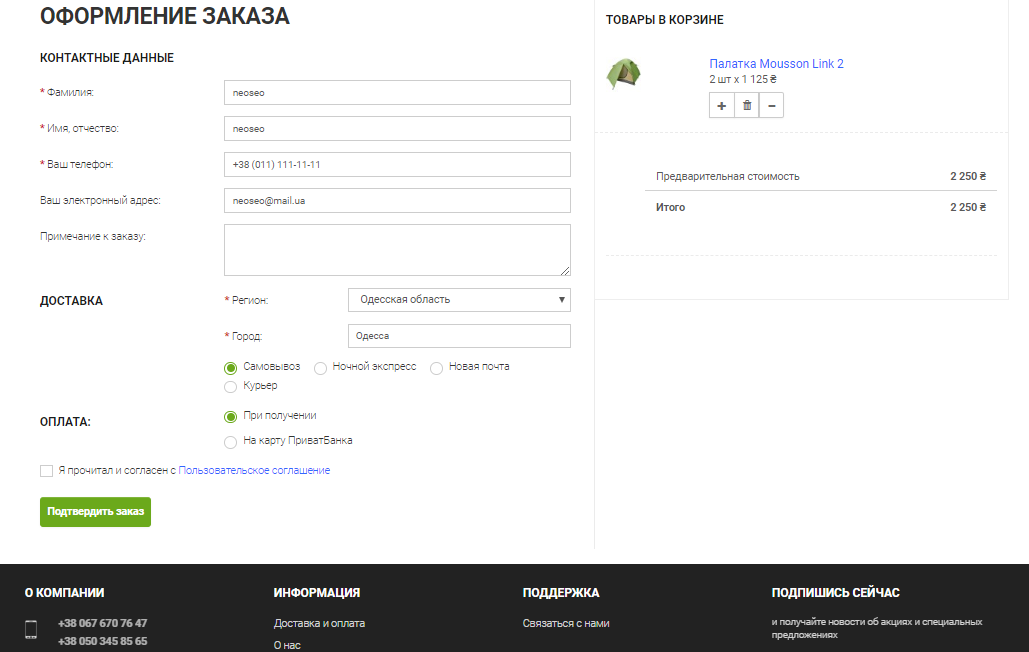
Enabling this option will hide the footer on the checkout page.
- Use phone mask.

Enabling this option will use the International Telephone Input plugin to validate international phone number input. Please note that enabling this option overrides the phone number mask set in the customer settings.
If the option is disabled, then the mask for entering a phone number from the buyer's settings will be in effect.
2.2. Setting up fields for the “Customer”
blockThe “Customer” tab is intended for setting the fields of the “Customer” block. At the very beginning, a list of buyer groups that are entered in the "Buyers" section will be displayed. – “Shopper groups”.
When you switch the checkbox to one of the positions, you will be able to edit the fields separately for each of the customer groups. Let's take a closer look at setting up the "Customers" block. In total, the following fields are available for customization and editing, each of which can be edited (the first blue button) and deleted (the second red button): ="margin: 10px; width: 1280px; height: 334px;" />
When you click on the “Edit” a window with field settings will appear: 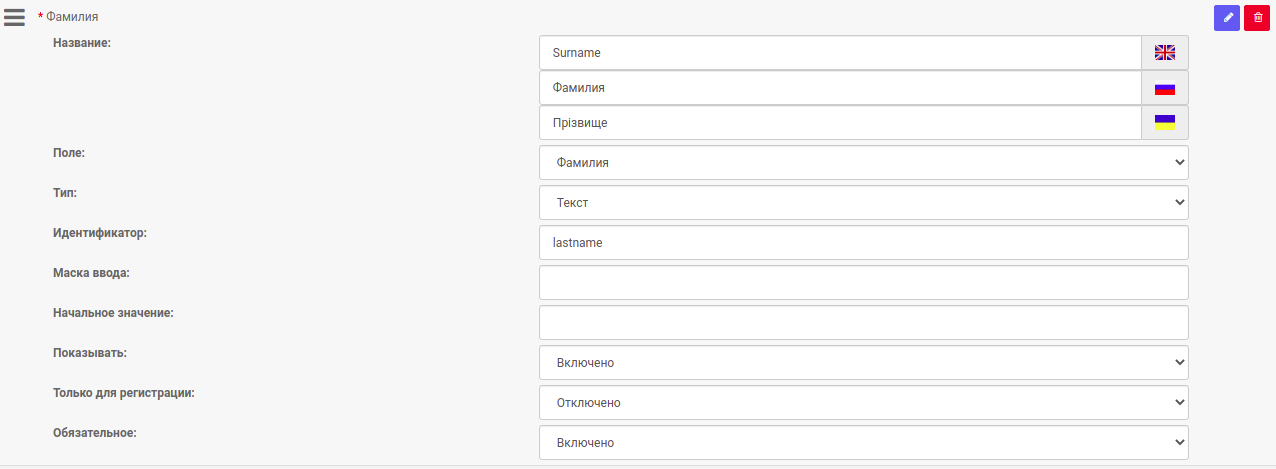
The following settings are available for each of the fields:
- Name. Here you must enter the name of the field in all languages of the store.
- Field. This setting is used to determine the purpose of the field. When configuring this option, you need to select one of the proposed options from the drop-down list (available options – name, surname, email address, phone, fax, TIN, company, OKPO, address, index, password, password confirmation, comment, additional field and discount number).
- Type. This setting specifies the format in which the field is expected to be filled. You need to select one of the options in the drop-down list:
- Text – single-line input expected;
- Multiline text – text can be entered on multiple lines;
- List – information will be in the form of a list;
- Switch – a checkbox for this field will be displayed;
- The – in this field, the ability to check/uncheck the box will be implemented;
- Password – the entered text will be hidden with *, only the number of characters entered can be seen;
- HTML – text in HTML format (with tags);
- File – this field will be for uploading files.
- Identifier. This setting allows you to set a name for the field, for example:

As an identifier, you must specify the name of the column from the database order table, which will be filled with the value from this field when the customer places an order.
Note that IDs must be unique for each field.
- Input mask. This setting is used to minimize errors when filling in fields. Setting an input mask prevents the user from entering potentially invalid data (such as too many or too few digits in a phone number).

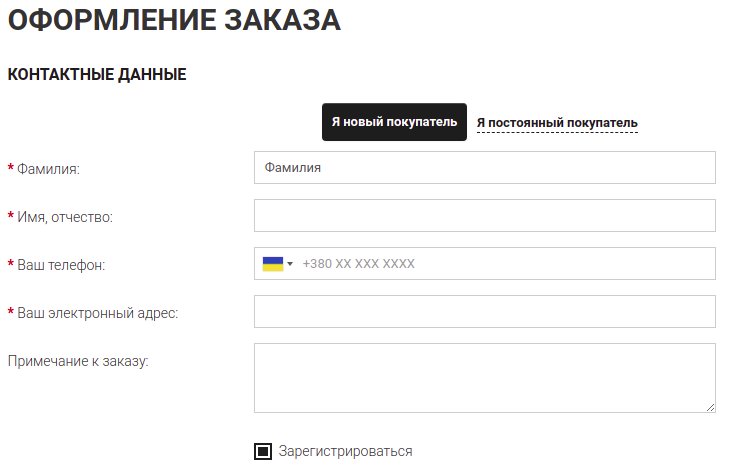
- Initial value. When entering text in this setting, the text will be immediately displayed on the checkout page:


- Show. If this option is enabled, the field will be displayed on the checkout page. If the option is disabled, the field will not be shown during checkout.
- Only for registration. If this option is enabled, the field will be displayed on the checkout page only if the buyer checks the box in the “Sign up”:
- Required. When this option is enabled, the field must be filled in mandatory, otherwise the order will not be processed, and the buyer will be notified about it. Such fields are marked with a red asterisk:

Fields with this option disabled can be left blank.
Creating a new field is done by clicking on the “Add” button, filling in the settings is similar to editing an existing field.
Customized fields from the “Customer” of this module are used in the module “NeoSeo Buyer's personal account” when registering it.
2.3. Setting up the “Payment methods”
blockThe “Payment” tab is intended for setting the following options:
- Show payment method logo. When this option is enabled, the corresponding logo will be displayed next to the name of the payment method (if the presence of a logo is provided by the developer of the payment module, otherwise, even if the option is enabled, the logo will not be displayed):

When this option is disabled in the “Payment” Only the names of possible payment methods will be displayed.
- Select the payment method. The option accepts the following values:
- Switch. If this value is selected, the list of available payment methods will be displayed on the checkout page in the form of switches:
- List. If you select this value, the list of available payment methods will be displayed on the checkout page as a list:

- Update the cart when changing the payment method. If this option is enabled, the cart will be automatically updated if the customer changes the payment method.
- Fields for the payment method. This field is represented by a drop-down list, when you select any method from the list, you can add, edit and delete additional fields for this payment method.
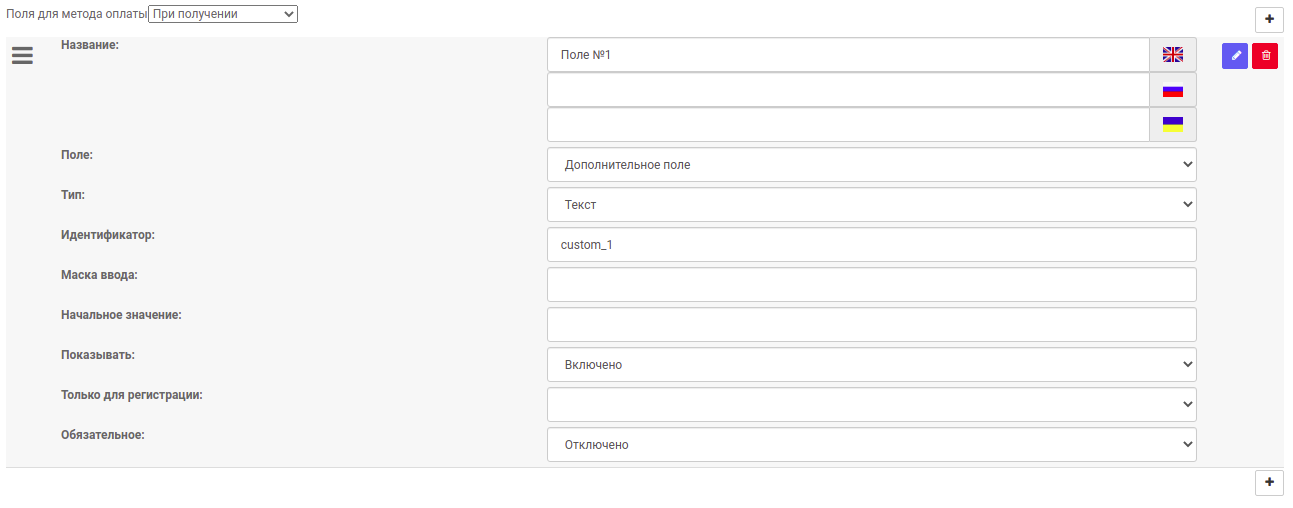
The following options can be configured for each created or existing field:
- Field name in all languages available in the store;
- Field – then, for entering what kind of information this field will serve. Available options: first name, last name, email address, phone, fax, TIN, company, OKPO, address, index, password, password confirmation, comment, additional field and discount number;
- Type. This setting specifies the format in which the field is expected to be filled. You need to select one of the options in the drop-down list:
- Text – single-line input expected;
- Multiline text – text can be entered on multiple lines;
- List – information will be in the form of a list;
- Switch – a checkbox for this field will be displayed;
- The – in this field, the ability to check/uncheck the box will be implemented;
- Password – the entered text will be hidden with *, only the number of characters entered can be seen;
- HTML – text in HTML format (with tags);
- File – this field will be for uploading files.
- Identifier. This setting allows you to set a name for the field, for example:

As an identifier, you must specify the name of the column from the database order table, which will be filled with the value from this field when the customer places an order.
Note that IDs must be unique for each field.
- Input mask. This setting is used to minimize errors when filling in the fields. If you set an input mask, the user will not be able to enter potentially incorrect data.
- Initial value. Entering text in this setting will immediately display the text on the checkout page.
- Show. If this option is enabled, the field will be displayed on the checkout page. If the option is disabled, the field will not be shown during checkout.
- For registration only. If this option is enabled, the field will be displayed on the checkout page only if the buyer checks the box in the "Register" section.
- Required. When this option is enabled, the field must be filled in mandatory, otherwise the order will not be processed, and the buyer will be notified about it. Such fields are marked with a red asterisk. Fields with this option disabled can be left blank.
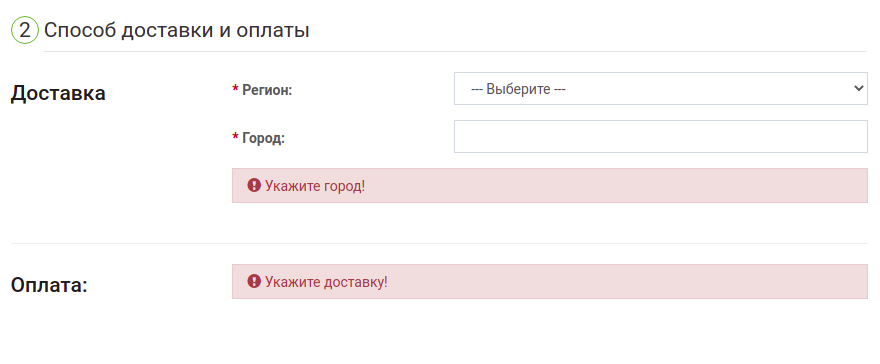
2.4. Setting up the “Delivery methods”
blockThe “Delivery” tab is intended for setting the following options:
- Choose a shipping method. The option takes the following values:
- Switch. If this value is selected, the list of available delivery methods will be displayed on the checkout page as switches:

- List. If this value is selected, the list of available payment methods will be displayed on the checkout page as a list:

- Show delivery before city selection.
If this option is disabled, the block with delivery methods will be available only after the client fills in the delivery address block: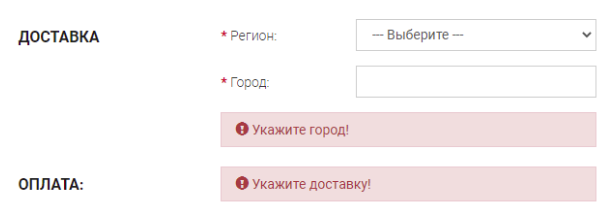
When this option is enabled, the block with delivery methods will be available before the delivery address block: 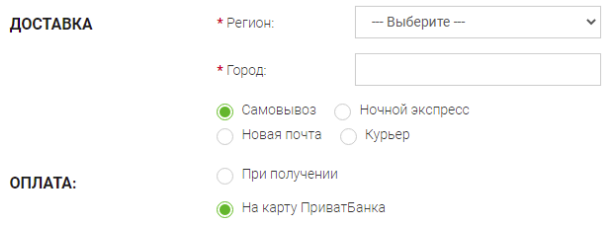
Pay attention! Not all shipping methods can be displayed. Some shipping methods require you to select a city before they are shown. When this option is enabled, the city entry block will be hidden and displayed only for the delivery services selected below. For this option to work, the fields "Default Country", "Default Region", "Default City" must be filled in.
- List of delivery methods that require a city selection. This option allows you to specify delivery methods that require a city selection:

When using the “Show delivery before city selection” option, the city selection block will be displayed only for the selected delivery methods.
- Entering a city. The option takes the following values:
- Manually enter the country and region. When this value is selected, the fields “Country”, “Region”, “City” will be displayed in the delivery address block. to be filled in by the client.
- Automatic substitution of the country and region by city name. If this value is selected, only the “City” field will be displayed in the delivery address block. The entered city name will automatically determine the country and region.
- Disabled. If this value is selected, the delivery address block will not be displayed.
- Entering the country. When this option is enabled, the "Country" field will be displayed in the delivery address block.
If this option is disabled in the delivery address block, the "Country" field will be hidden. When choosing this value, you must fill in the option “Default country”.
- Default country. The field allows you to specify which country will be delivered to by default (you must select from the drop-down list).
- Default region. The field allows you to set the default region for delivery (you need to select from the drop-down list “All regions” or one of the regions of the country that was selected in field “Default country”).
- Default city. In this field, if necessary, enter the name of the city. After saving this setting, the city will be selected as the default delivery city.
- Update the cart when changing the shipping method. If this option is enabled, the cart will be automatically updated when the customer changes the shipping method.
- Display the name of the delivery group. If this option is enabled on the checkout page, the name of the delivery group will be displayed above the list of available delivery methods:

If this option is disabled, the group name will not be displayed: 
- New Mail API key. This field must be filled in if you use delivery via Nova Poshta. The key can be obtained in the personal account of “Novaya poshta” under “Settings” – “API 2.0”. The page will have a section “List of Keys” If there is no key, then you need to click the "Create key" button. The resulting key must be entered in this field.
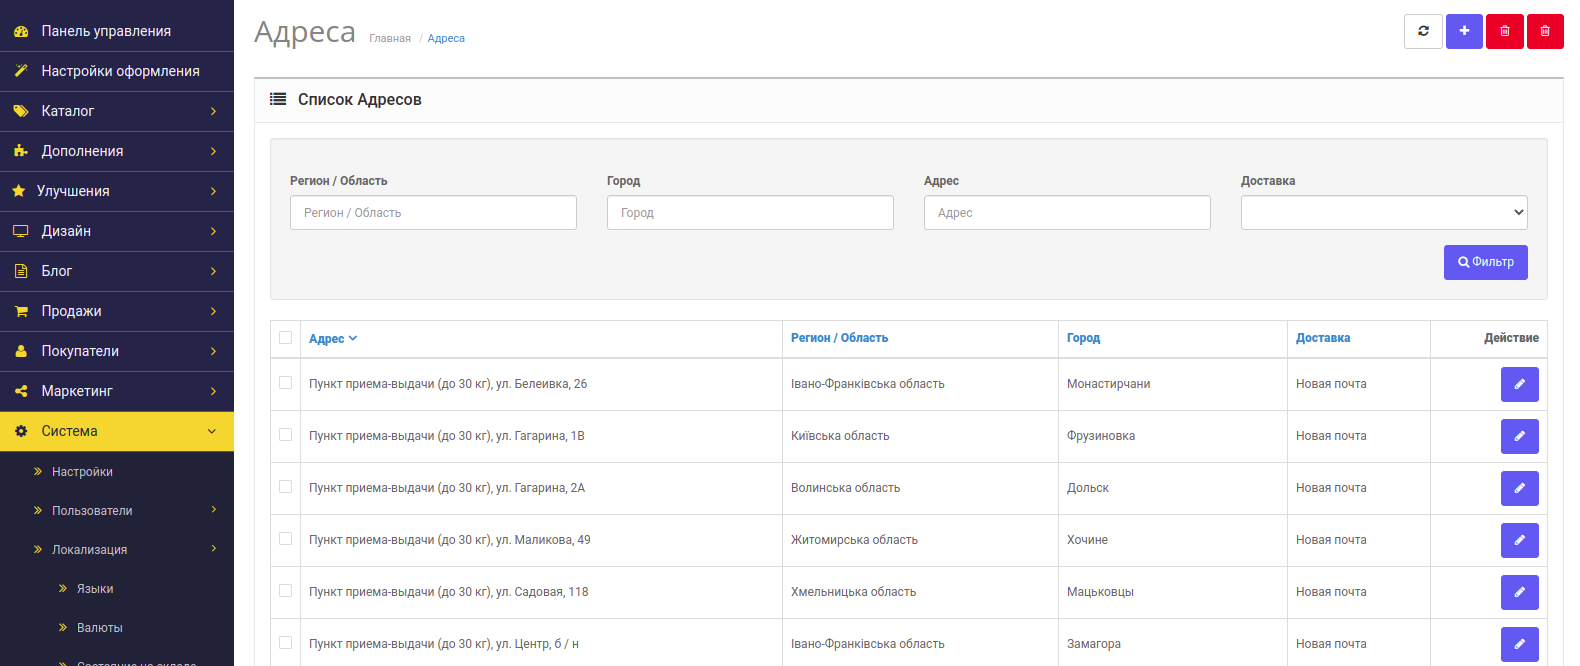
The key will be used if delivery methods are selected in the next option "Delivery method for New mail". The key will be used to connect to the API to update the lists of New Mail addresses. In the administrative panel, this list can be found in the “System” – “Localization” – “Addresses”. In the same section, you can manually update the address database.
- Identifier. This setting allows you to set a name for the field, for example:
As an identifier, you must specify the name of the column from the database order table, which will be filled with the value from this field when the customer places an order.
Note that IDs must be unique for each field.
- Input mask. This setting is used to minimize errors when filling in fields. If you set an input mask, the user will not be able to enter potentially incorrect data.
- Initial value. When you enter text in this setting, the text will be immediately displayed on the checkout page.
- Show. When this option is enabled, the field will be displayed on the checkout page. If the option is disabled, the field will not be shown during checkout.
- For registration only. If this option is enabled, then the field will be displayed on the checkout page only if the buyer checks the box in the "Sign up" section.
- Required. When this option is enabled, the field must be filled in mandatory, otherwise the order will not be processed, and the buyer will be notified about it. Such fields are marked with a red asterisk. Fields with this option disabled can be left blank.
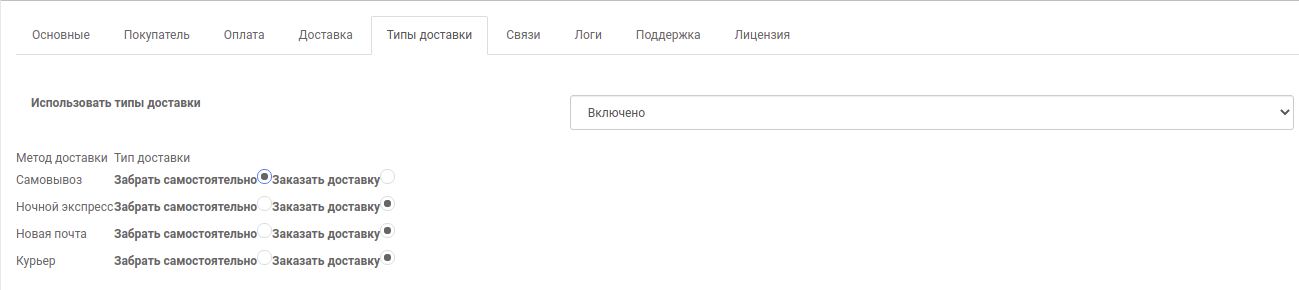
2.5. Setting delivery types options
Tab “Delivery Types”. On this tab, you can enable or disable the item "Use shipping types". If this option is disabled, types will not be used. If you activate this option, then for each delivery method it will be possible to select the type of delivery using the – “Pick up yourself” or “Order delivery”:
2.6. Setting the dependencies of payment methods on delivery methods
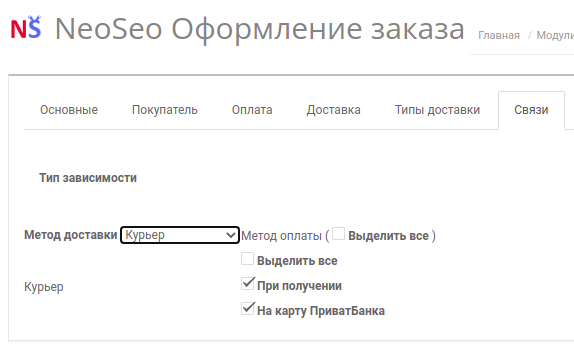
The “Links” tab is used to link payment methods to shipping methods. At the very beginning, you need to specify the type of links in the “Dependency Type” field.
If you select the option "Payment and delivery are independent of each other" links do not need to be configured:

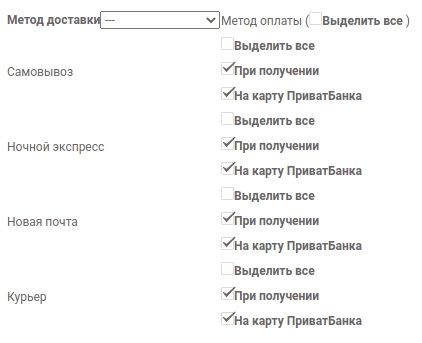
If you select the option “Payment depends on delivery” the list of available delivery methods will be displayed in the left column, next to each of them all available payment methods will be displayed. You must check the boxes next to the payment methods that you want to use when choosing a specific delivery method:
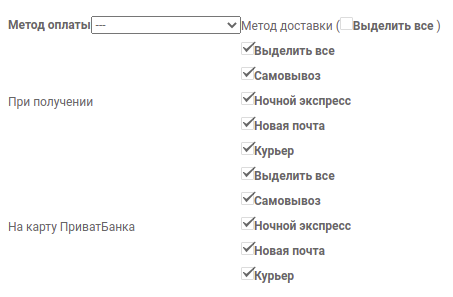
If you select the option “Delivery depends on payment” the list of available payment methods will be displayed in the left column, next to each of them all available delivery methods will be displayed. You must check the boxes next to the delivery methods that you want to use when choosing a specific payment method:
Important: if you add new delivery or payment methods to your store, you need to go to the settings module “NeoSeo Design order” to the “Contacts” and check the boxes next to the new methods. This must be done if you have set any of the types of dependencies in the module settings, except for the item "Payment and delivery do not depend on each other".
3. Examples of configuring shipping methods
3.1. An example of setting up the delivery method by “Novaya poshta” with a drop-down list of addresses on the checkout page
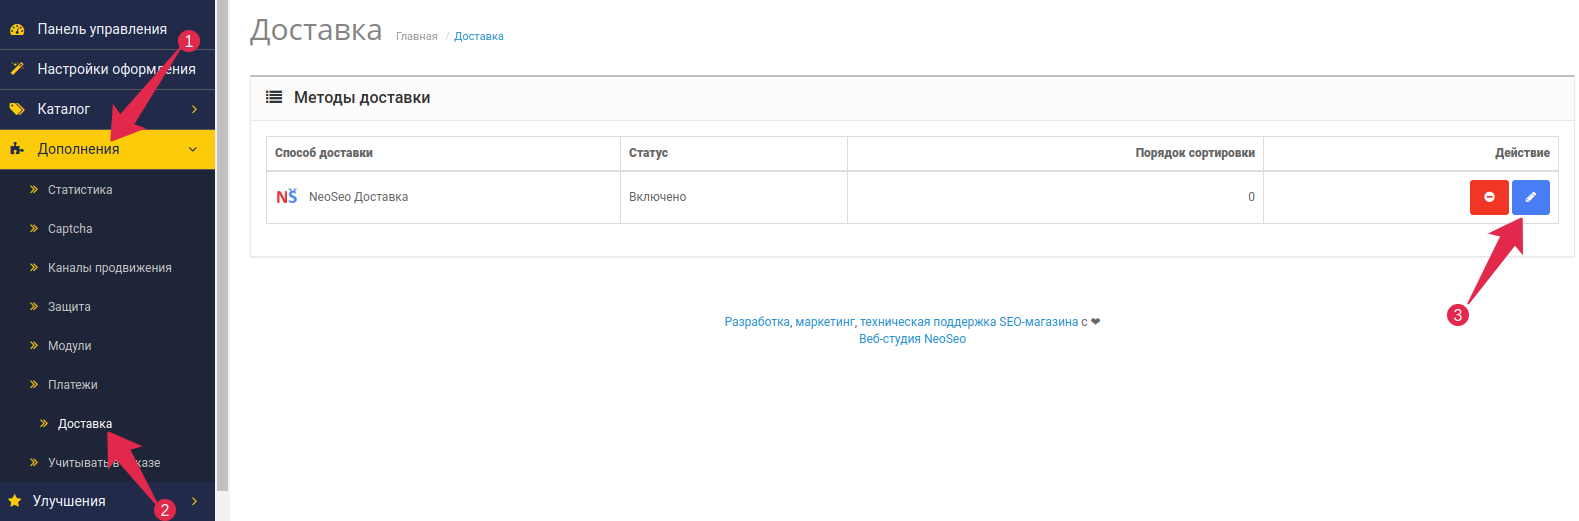
An example will be covered using the module “NeoSeo Delivery”. To add a delivery method, go to the “Add-ons” – “Delivery” and click on the edit module button.
In the module settings window, on the “List of delivery methods+” click on the button “Add”:

Now you need to fill in the fields to create a new shipping method, as shown in the example:
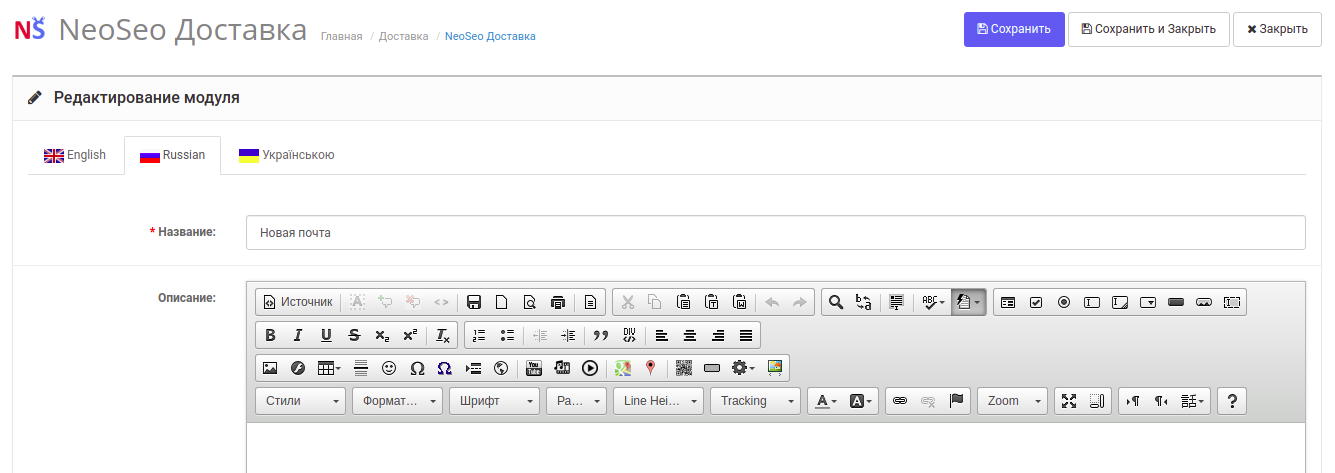

- Name: the name of the delivery method, for example, “Nova Poshta”.
- Description: this field is optional, if you wish, you can enter a description of the delivery method in this field.
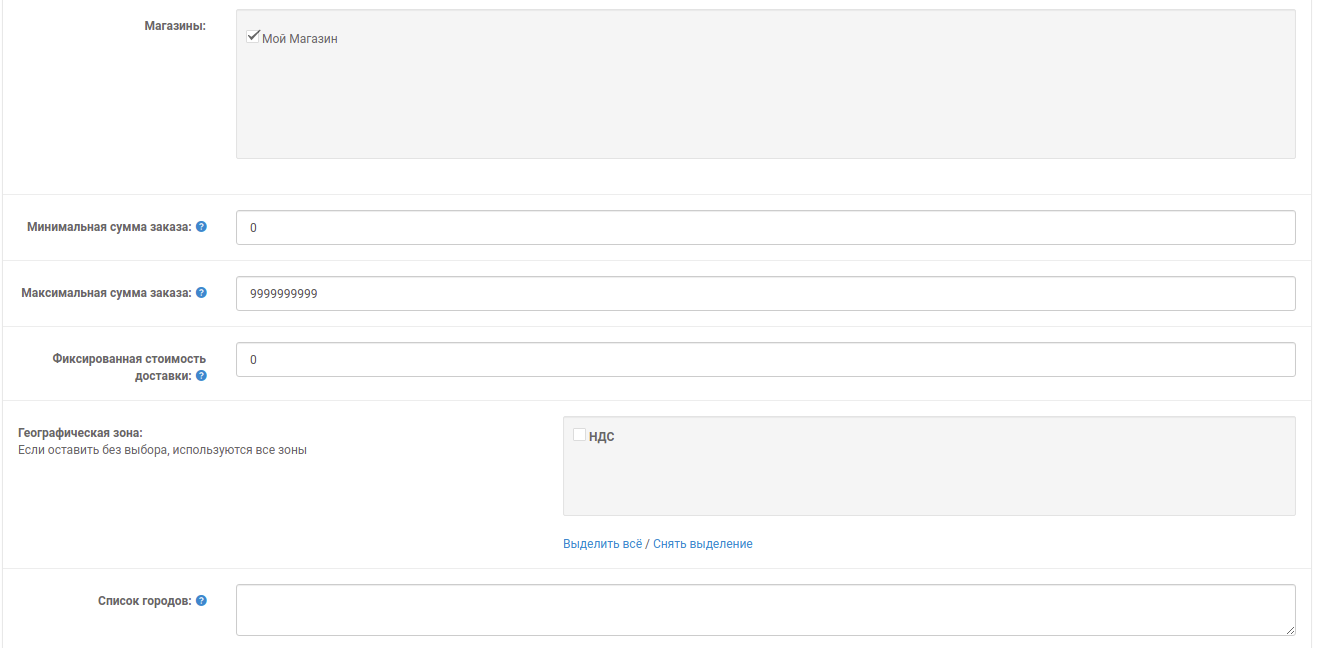
- Stores: you must check the box next to "My Store".
- Minimum order amount: if you wish, you can enter a numerical value in this field, that is, the order amount, starting from which this delivery method will be available. In order not to limit the delivery method by the minimum amount, the field can be left blank.
- Maximum order amount: If you wish, you can enter a numeric value in this field, that is, the amount of the order, after which this delivery method will be available. In order not to limit the delivery method by the maximum amount, the field can be left empty.
- Fixed shipping cost: if you want the shipping cost to be the same for all orders, enter the shipping cost in this field. To not set a fixed price, this field can be left blank.
- Geographical zone: in this field, all geographic zones of your store are available for selection. You can select one or more of them, if you leave this field unchecked (do not check any zone), all available zones will be used.
- List of cities: this field must be filled in if you want the delivery method to work in one or more specific cities (in this case, the name of the cities must be entered through the separator “;”). If you leave this field blank, the delivery method will be valid in all cities.
- Status: if you set this field to "Enabled", the shipping method will be valid in the store, if you set it to "Disabled", it will be invalid.
- Sort order: field specifies the order in which all existing delivery methods will be displayed (for example, if you enter “1” in this field, then the method will be displayed first in the storefront, if “2&rdquo ; – second, etc.).
- Geographical zone: allows you to add a new zone, if necessary, by clicking on the "Add" button; and enter the data you need in the field “Price per weight”:

Posle vneseniya vsekh neobkhodimykh nastroyek neobkhodimo nazhat' na knopku “Sokhranit'”, posle chego metod oplaty “Novaya pochta” budet uspeshno sozdan i otobrazitsya v module “NeoSeo Oformleniye zakaza”. V yego nastroykakh v razdele “Dostavka”, v pole “Metod dostavki dlya novoy pochty” neobkhodimo postavit' galochku naprotiv tol'ko chto sozdannogo nami metoda:

Takzhe neobkhodimo na vkladke “Svyazi” podvyazat' k nemu metody oplaty (yesli u vas ustanovlen lyuboy iz tipov svyazey, krome “Oplata i dostavka ne zavisyat drug ot druga”, v etom sluchaye na vkladke “Svyazi” nichego delat' ne nuzhno):

Dlya podtyagivaniya spiskov gorodov i adresov otdeleniy nuzhno poluchit' i sokhranit' API-klyuch Novoy pochty (detal'neye ob etom opisano vyshe v razdele “Nastroyka bloka “Metody dostavki””). Vvesti yego neobkhodimo na vkladke “Dostavka” v sootvetstvuyushcheye pole:

Posle etogo v razdele “Sistema” – “Lokalizatsiya” – “Adresa” Vam budet dostupna vozmozhnost' obnovlyat' spisok otdeleniy. Pered obnovleniyem zhelatel'no udalit' vse adresa s razdela pri pomoshchi knopki “Udalit' vse zapisi”. Obnovleniye spiska otdeleniy proizvoditsya putem nazhatiya na knopku “Obnovit'”.
Daleye v nastroykakh modulya na vkladke “Dostavka” neobkhodimo dobavit' novoye pole dlya optsii “Polya dlya metoda dostavki”. Snachala iz vypadayushchego spiska dostupnykh metodov dostavki vyberite sozdannyy metod dostavki “Novaya pochta”, a zatem nazhmite na knopku “Dobavit' pole”. 
Nastroim novoye pole dlya dostavki Novoy pochtoy:
- Nazvaniye. Dlya primera vvedem v pole znacheniye “Nomer otdeleniya” (vvedite nazvaniye na vsekh yazykakh, dostupnykh v sisteme).
- Pole. Vyberem znacheniye “Dopolnitel'noye pole”.
- Tip. Vyberem tip polya “Spisok”.
- Identifikator. Vvodim identifikator “address_1”.
- Maska vvoda. Dannuyu optsiyu mozhno ostavit' pustoy, poskol'ku pol'zovatelyu budet dostupen vypadayushchiy spisok adresov otdeleniy i v maske net neobkhodimosti.
- Nachal'noye znacheniye. Dannuyu optsiyu mozhno ostavit' pustoy, poskol'ku pol'zovatelyu budet dostupen vypadayushchiy spisok adresov otdeleniy i v maske net neobkhodimosti.
- Pokazyvat'. Vyberem znacheniye “Vklyucheno”, chtoby metod dostavki Novoy pochtoy otobrazhalsya na stranitse oformleniya zakaza.
- Tol'ko dlya registratsii. Vybirayem “Otklyucheno”, chtoby u pokupatelya byla vozmozhnost' ispol'zovat' dannyy metod dostavki, oformlyaya zakaz bez registratsii v magazine.
- Obyazatel'noye. Zadayem znacheniye “Vklyucheno”, chtoby bez vybora otdeleniya dostavki ne bylo vozmozhnosti zakonchit' oformleniye zakaza.
Показати більше 3 686 / 5 000 Результати перекладу
After making all the necessary settings, you must click on the “Save” button, after which the payment method “Nova Poshta” will be successfully created and displayed in the "NeoSeo Checkout" module. In its settings in the "Delivery" section, in the "Delivery method for new mail" field; you need to check the box next to the method we just created:
Also required on the “Links” link payment methods to it (if you have any of the types of links set, except for "Payment and delivery are independent of each other", in this case, you do not need to do anything on the "Links" tab):
To pull up the lists of cities and addresses of departments, you need to obtain and save the Nova Poshta API key (details on this are described above in the "Setting up the" Delivery methods "block" section). You must enter it on the tab “Delivery” to the corresponding field:
After that, in the “System” – “Localization” – “Addresses” You will be able to update the list of branches. Before updating, it is advisable to delete all addresses from the section using the "Delete all entries" button. Updating the list of branches is done by clicking on the “Update” button.
Next, in the module settings on the “Delivery” you need to add a new field for the "Fields for shipping method" option. First, from the drop-down list of available delivery methods, select the created New Mail delivery method, and then click on the Add Field button.

Let's set up a new field for delivery by New mail:
- Name. For example, enter the value “Department number” (enter the name in all languages available in the system).
- Field. Select “Additional field”.
- Type. Select the field type “List”.
- Identifier. Enter the identifier “address_1”.
- Input mask. This option can be left empty, since the user will have access to a drop-down list of branch addresses and there is no need for a mask.
- Initial value. This option can be left empty, since the user will have access to a drop-down list of branch addresses and there is no need for a mask.
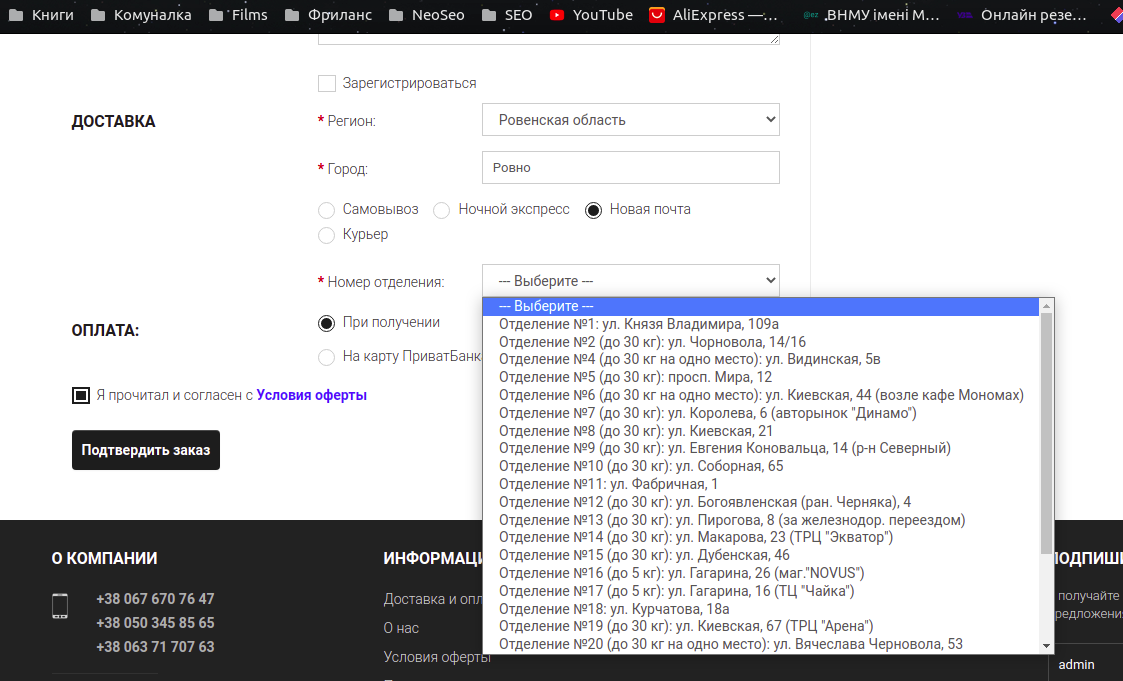
- Show. Let's select the "Enabled" value so that the delivery method by Nova Poshta is displayed on the checkout page.
- For registration only. Select “Disabled” so that the buyer can use this shipping method when placing an order without registering in the store.
- Required. Set the value to “Enabled”, so that without selecting a delivery branch, it would not be possible to complete the order.
After all the above settings, we save the module settings. After that, the delivery method will become available to the buyer on the storefront when placing an order with automatic pull-up of the drop-down list of branches after selecting the region and city.
3.2. Example of configuring a courier delivery method
An example will be covered using the module “NeoSeo Delivery”. To add a delivery method, go to the “Add-ons” – “Delivery” and click on the edit module button.
In the module settings window, on the “List of delivery methods+” click on the button “Add”:
Now you need to fill in the fields to create a new shipping method, as shown in the example:

- Name: name of the shipping method, e.g. “Courier”.
- Description: this field is optional, if you wish, you can enter a description of the delivery method in this field.
- Stores: you must check the box next to the inscription "My store".
- Minimum order amount: if you wish, you can enter a numerical value in this field, that is, the order amount, starting from which this delivery method will be available. In order not to limit the delivery method by the minimum amount, the field can be left blank.
- Maximum order amount: If you wish, you can enter a numeric value in this field, that is, the amount of the order, after which this delivery method will be available. In order not to limit the delivery method by the maximum amount, the field can be left empty.
- Fixed shipping cost: if you want the shipping cost to be the same for all orders, enter the shipping cost in this field. To not set a fixed price, this field can be left blank.
- Geographical zone: in this field, all geographic zones of your store are available for selection. You can select one or more of them, if you leave this field unchecked (do not check any zone), all available zones will be used.
- List of cities: this field must be filled in if you want the delivery method to work in one or more specific cities (in this case, the name of the cities must be entered through the separator “;”). If you leave this field blank, the delivery method will be valid in all cities.
- Status: if you set this field to "Enabled", the shipping method will be valid in the store, if you set it to "Disabled", it will be invalid.
- Sort order: field specifies the order in which all existing delivery methods will be displayed (for example, if you enter “1” in this field, then the method will be displayed first in the storefront, if “2&rdquo ; – second, etc.).
- Geographical zone: allows you to add a new zone, if necessary, by clicking on the "Add" button; and enter the data you need in the field “Price per weight”:
After making all the necessary settings, you must click on the “Save” button, after which the payment method “Courier” will be successfully created and displayed in the "NeoSeo Checkout" module. In its settings on the “Connections” you need to link payment methods to it (if you have any of the types of links set, except for "Payment and delivery are independent of each other", in this case, you do not need to do anything on the "Links" tab):
Next, in the module settings on the “Delivery” you need to add a new field for the "Fields for shipping method" option. First, from the drop-down list of available delivery methods, select the created "Courier" delivery method, and then click on the "Add field" button.

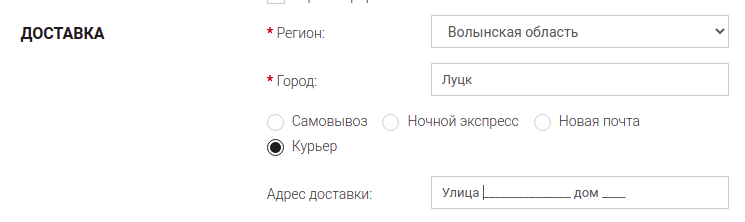
Set up a new field for courier delivery:
- Name. For example, let's enter in this field “Delivery address” (enter name in all languages) available in the system.
- Field. Select the “Additional field” value.
- Type. Select the field type “Text”.
- Identifier. Enter the identifier “address_1”.
- Input mask. You can leave this option empty, or you can set a mask so that the user enters the exact name of the street and house number, for example, “Street *************** house 9999”.< /li>
- Initial value. This option can be left empty, you can set a value that will be displayed immediately, for example, “Street”. If you are already using an input mask, leave this option blank.
- Show. Let's select "Enabled" to have the courier delivery method displayed on the checkout page.
- For registration only. Select “Disabled” so that the buyer can use this delivery method when placing an order without registering in the store.
- Required. Set the value to "Enabled" so that without entering the address it would not be possible to complete the order.
After all the above settings, save the module settings.
After that, the delivery method “Courier”: